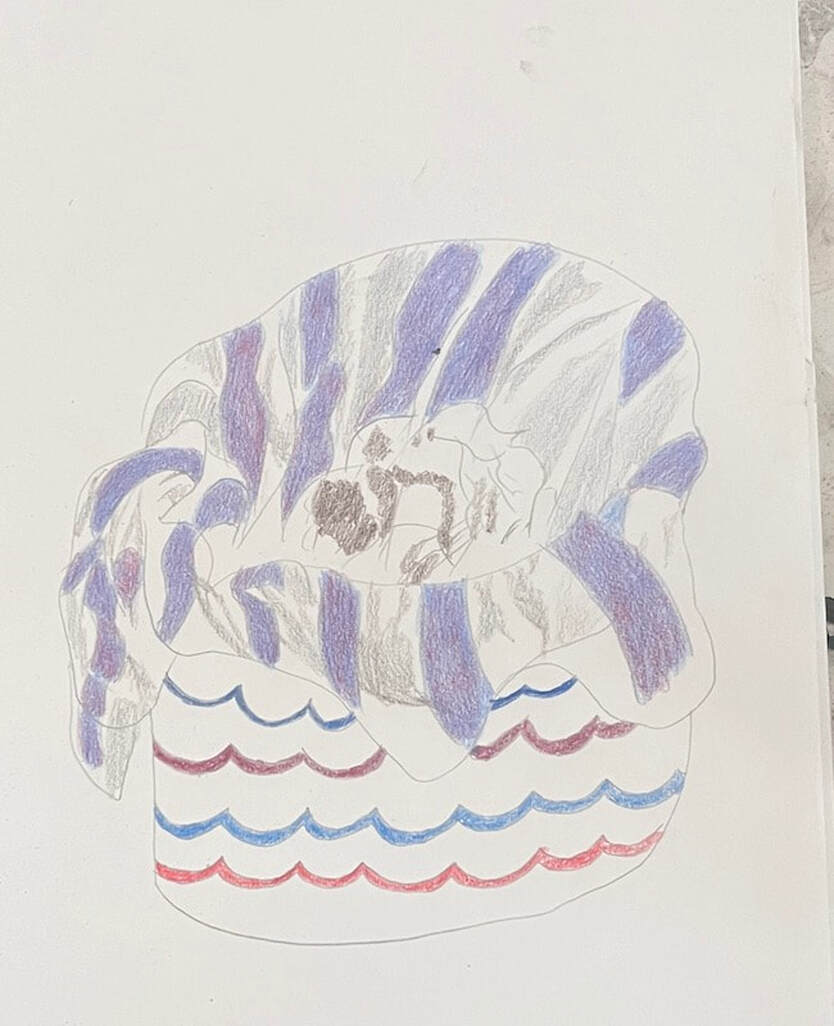
 Disclaimer: This article is aimed at people who are professional artists or want to be professional artists. Sometimes, I have times when I don’t feel like doing art. Yesterday was one of those days. Today might be one, too. So what do I do when I have those days? Do I say, “Oh, I don’t feel like doing art, so I won’t do it”? Nope. That’s not what I do. I’ll sit down with my sketchbook and draw whatever in my vicinity happens to catch my eye. Yesterday, it was my trash can. A few days ago, it was a paint palette. I don’t put pressure on myself to make a masterpiece. The only important thing is that I create something. 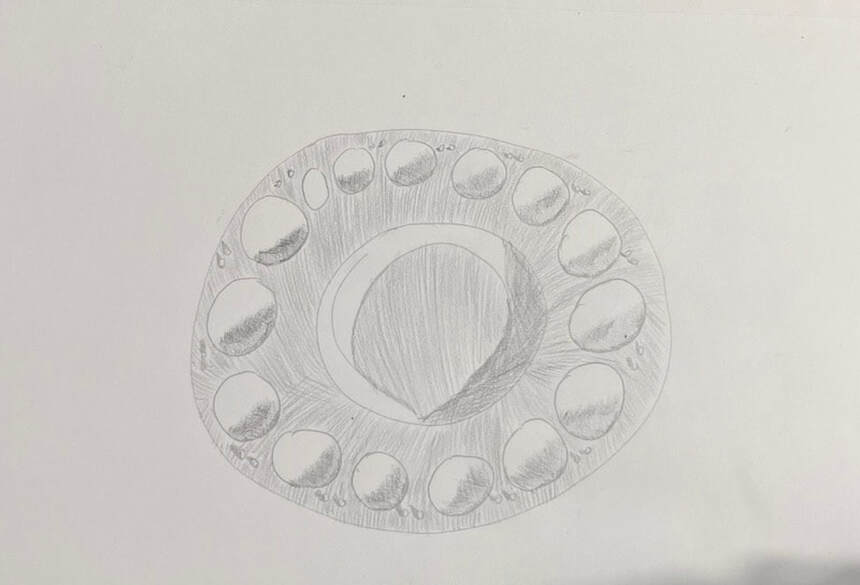 Here’s the thing, though. I can sit down, not wanting to draw, and ten minutes later, I do not want to stop because I’m focused on the lines and shadows I want to depict. Using the hatching technique to draw the shadows, especially the arc-shaped ones, in the palette's wells was a lot of fun. Sometimes, if I have a project and I’m not feeling motivated to work on it, I’ll find one thing I can do, even if it’s just painting a shadow somewhere, and once I’ve done that, I’ll notice something else I can do on it, and so on. I could sit down thinking I'm only going to paint for ten minutes and be at the easel for an hour. I know the title of this article was harsh, but I hope you found it encouraging. If you stumbled across it in a google search, consider subscribing to my newsletter to read more.
0 Comments
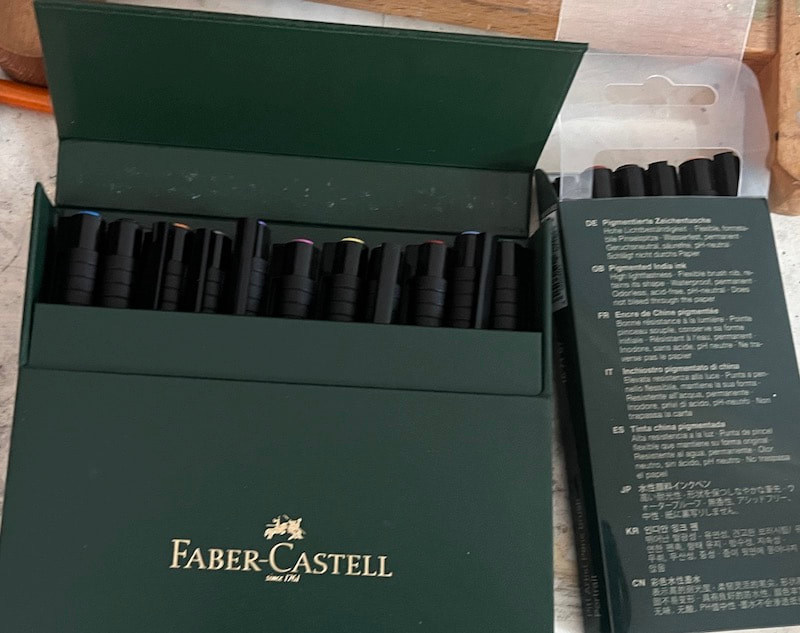 I'm doing my second major project with Faber-Castell's Pitt Pens, and I'd like to share what I'm learning so far. Lisa Clough of Lachri Fine Art's YouTube channel introduced me to these fabulous markers. According to Lisa, these are the only lightfast markers on the market, meaning they're the only markers that won't fade when exposed to light in "museum conditions." I saw on the package itself that these markers are actually India Ink in pen form. I thought that was a little fun fact. I’m using Strathmore’s 500 series paper with the Plate texture for this. I wasn't sure what I would be getting when I ordered this paper. I was disappointed at first because it's so smooth, I didn't think it would work with the graphite I normally use. I thought it was perfect for pen and ink, though. It soon became clear that when I’m mixing with these markers, the order in which I put down my colors really matters. Orange plus brown plus blue, for example, does not yield the same result as orange plus blue and brown. When I work with these, I keep a piece of sketching paper nearby so I can test out different color combinations. 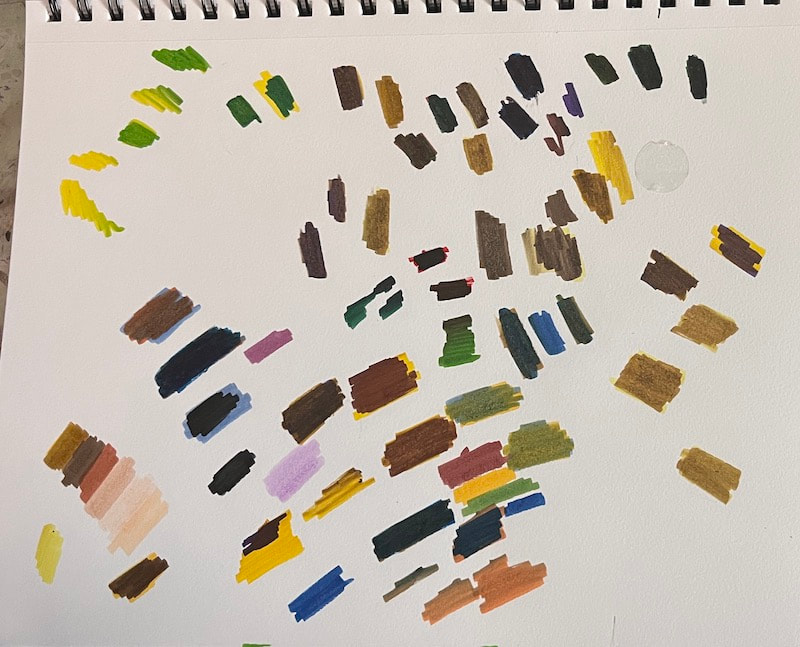 I struggled with making straight edges. Obviously, if I moved the marker back and forth a lot, the edge looked fuzzy, but if I moved it straight up and down, whatever I was drawing looked obviously outlined. I learned that to make natural-looking straight lines, I needed to move my marker in a vertical motion while making small circles. I was thinking about getting some of these markers in wider tips. It’s a bit frustrating trying to fill in several square inches of paper with a nib an eighth of an inch wide. My search didn’t turn up any truly thick nibs in the line, though. That’s the only con I found with them so far.
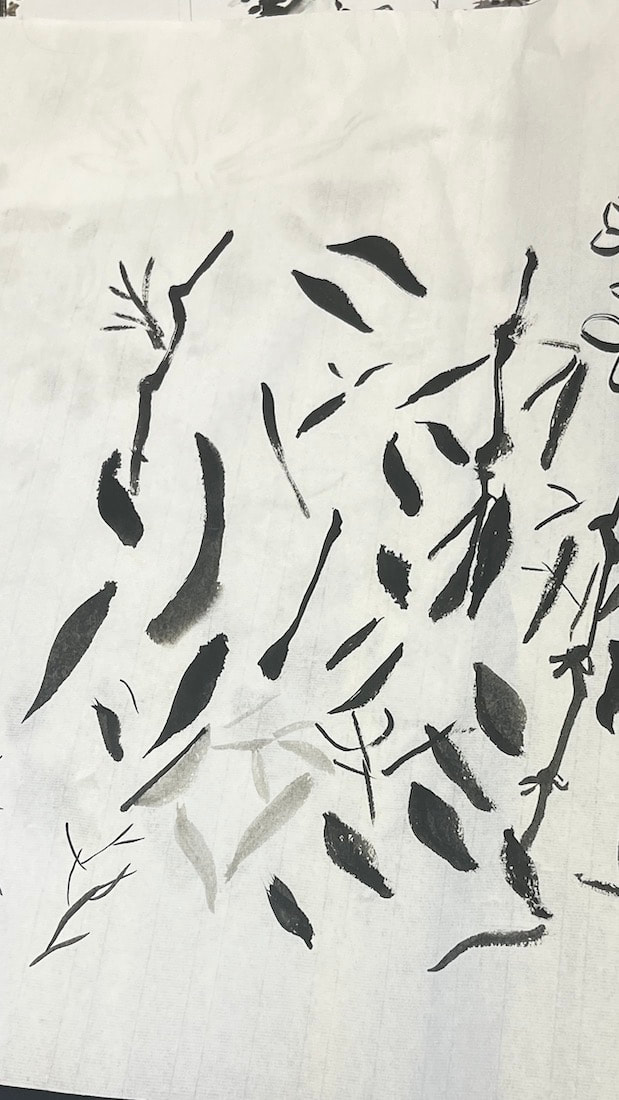
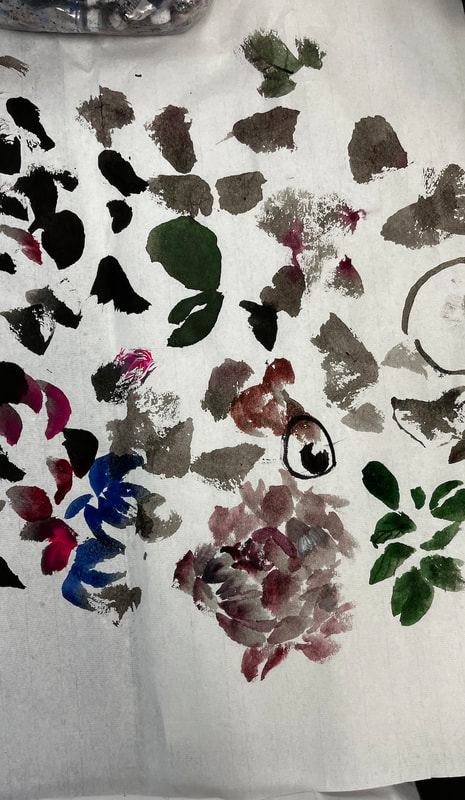
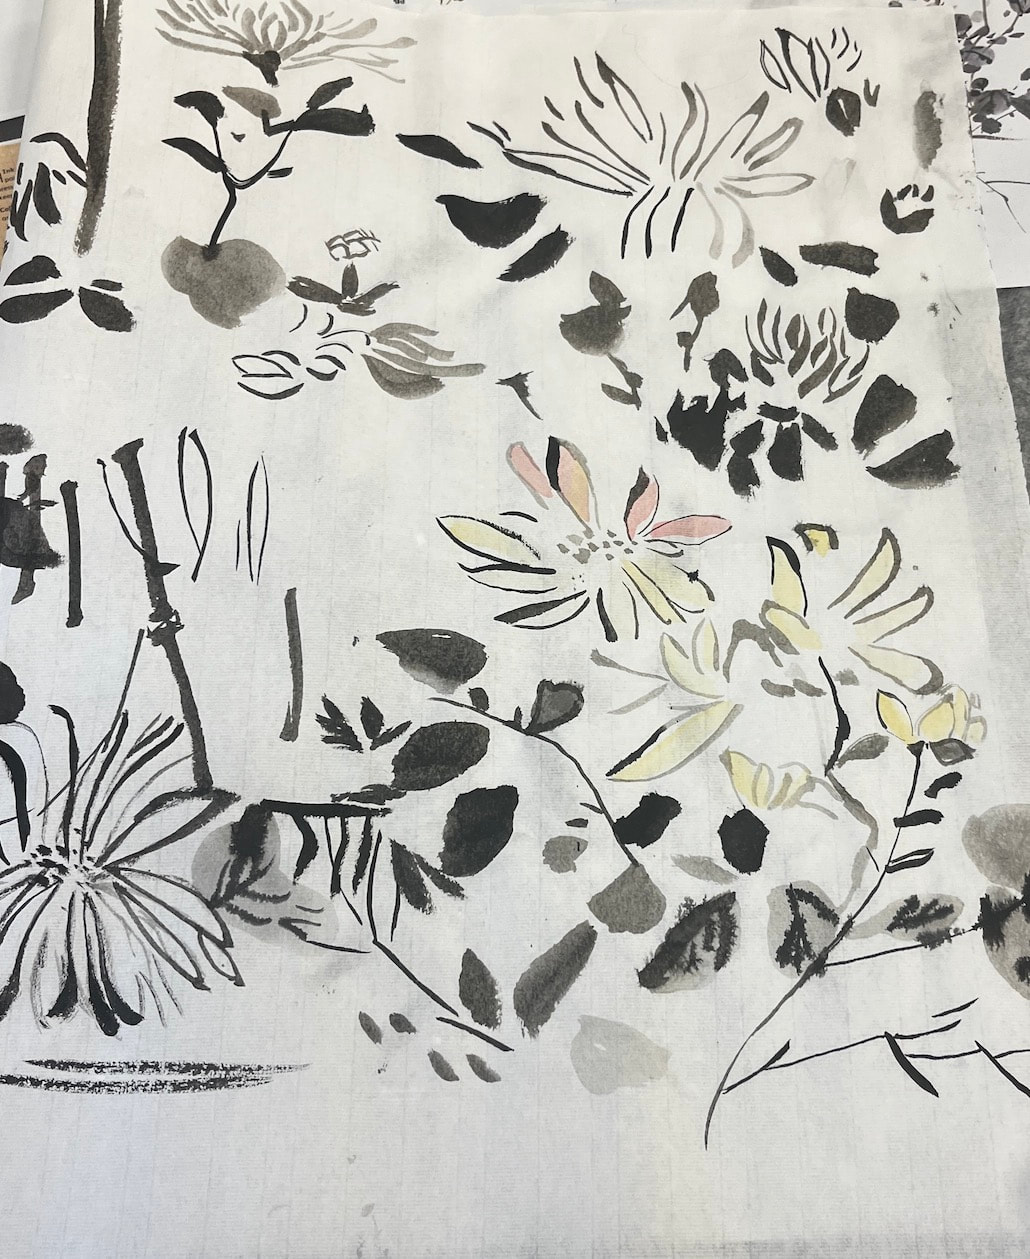
This past spring, I took a class in Sumi-e ink painting with my aunt and uncle and while taking it, I noticed some interesting and significant differences between Western and Eastern style art. Besides the materials, there'sthe type of stroke used. Most strokes in Western-style art are what I can best term static strokes. By that, I mean strokes that are the same from start to finish. In Western art, we draw an object, that is, outline the shape, and then fill it in, using a series of static strokes. On the other hand, the type of stroke used in Eastern-style art is what I’ll call the dynamic stroke. Unlike the static stroke, the dynamic stroke changes from start to finish. It can start thick and get thin or start thin and get thick. It can begin skinny, get wide, and get skinny again. So, in Eastern art, the artist often does not outline and fill in but paints an object, say a leaf, using one dynamic stroke. I learned to paint a petal using the Sumi-e technique. You load up your brush with paint or ink. You lightly press the tip to the paper, and here’s the tricky part: gently roll the brush to one side while keeping the tip as still as possible. If you do this just right, and I haven’t mastered it, you can get a two-tone look by loading your brush with white and then dipping just the tip of it into another color, such as red. As you roll your brush with the tip stationary, the stroke will be red on the small end and white on the fat end, giving you a red-tipped petal. Below are some paintings I made in the class. I'm working on painting a penguin underwater and I want it to be smooth, almost like glass. To create this look, I painted light greenish blue to start. When that was dry, I glazed green even more thinly so the blue would show over that. By letting the blue show through my layer of green, I create the look of light coming through the water. 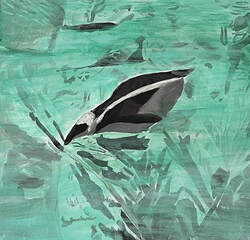 I used this same technique to paint the seaweed. I painted them green to start, then lightly layered blue over them. 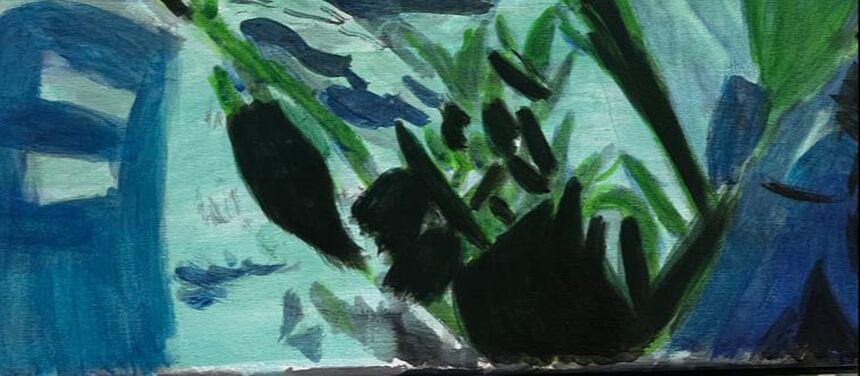 Your bottom layer must be dry before you paint over it. You’ll take it off when you apply your second layer if it isn't. Your second layer needs to be thin enough to let your top layer show, and the color of it really shouldn’t be noticeable. Blend out the edges of your top layer as much as possible. You only want to be able to see the effect it’s giving.
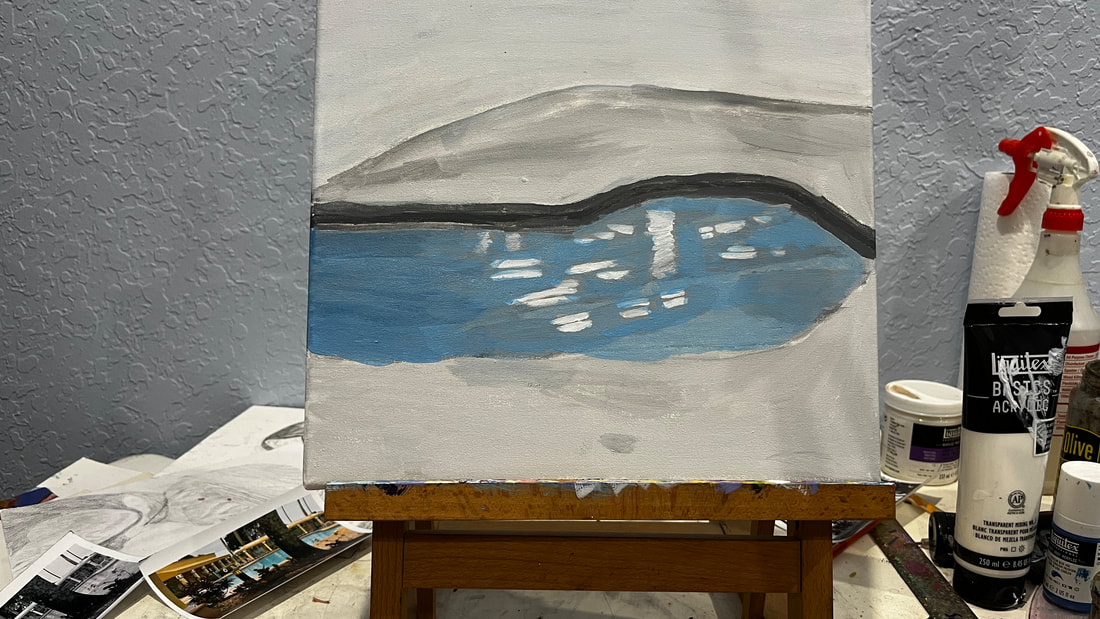
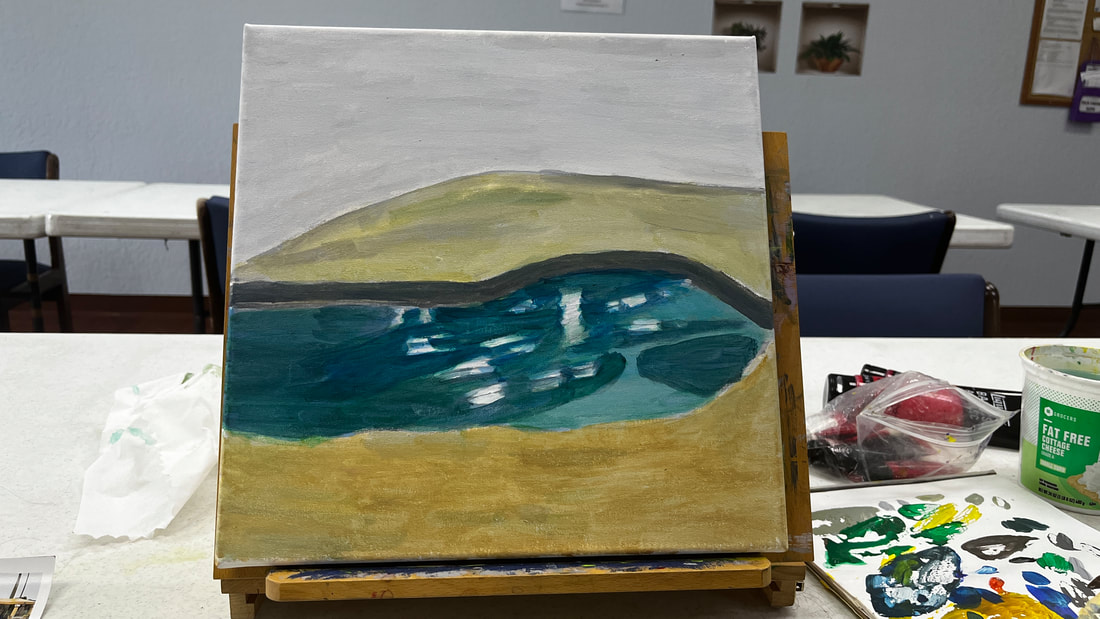
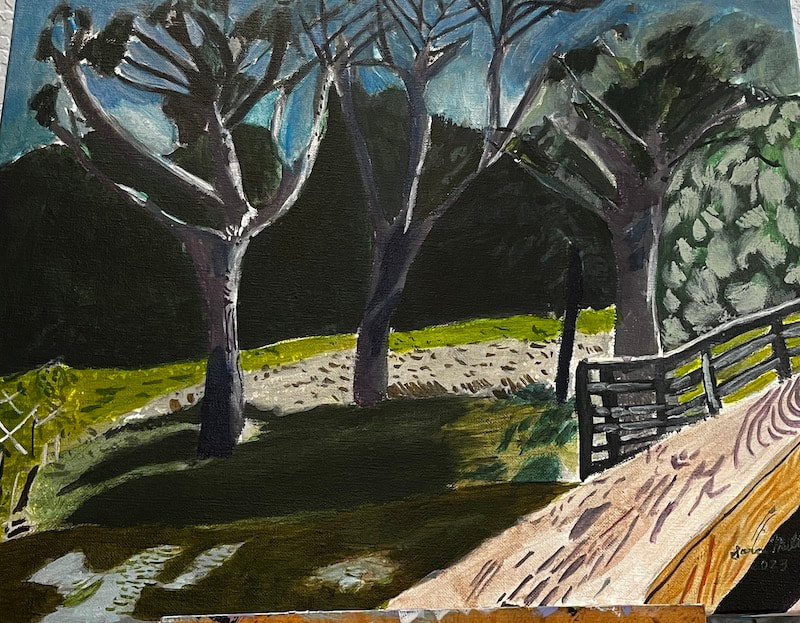 I'm presenting my latest painting, a landscape in acrylics. I walked into this clearing on a trip to a nature reserve called Wakodahatchee. It looked so peaceful in its simplicity. I imagine it as a place to escape the hustle and bustle of life for a while, so I’ve titled the piece “Getting Away."
You can buy prints and other merchandise featuring this piece from my Fine Art America site. Materials: Liquitex Basics and Amsterdam Standard Series, Fredrix Green Label Canvas 16x20 Belgian Linen, medium filbert, large filbert, small round, and liner brush, brand unknown 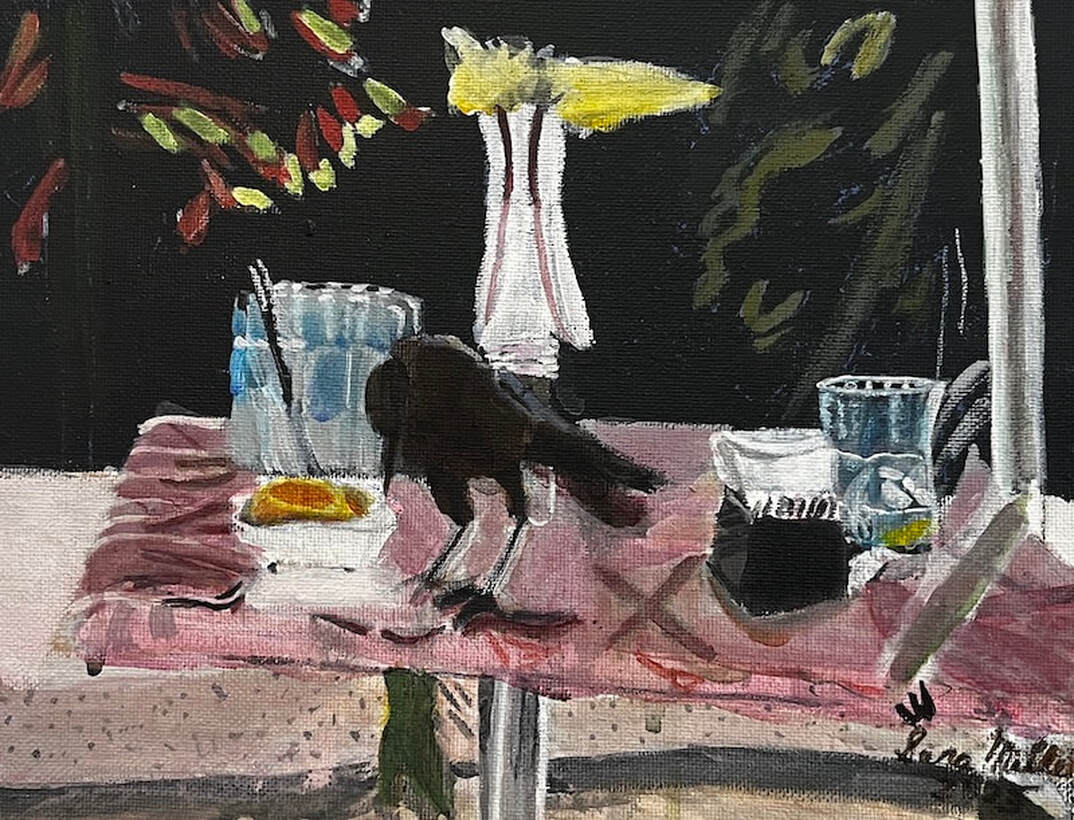 A couple of months ago, I went out to lunch with some ladies from my art group at the Mimosa Cafe. There were a bunch of these little birds flitting around and I happened to capture one of them that had landed on a table across from me. It was important to me to the depict the textures of the marble table and the glasses themselves. When it came to the glasses, to achieve the goal of transparency, I layered transparent mixing white for “frost” over cyan blue. I contrasted titanium white and mars black for shine. As far as transparency, I let the background colors show. That, contrasted with the opacity of the titanium white, adds to the translucence. I focused on the shapes formed by the frost, the highlights, and how they were positioned next to each other, not on the whole glass at once. I don’t have much experience painting glass and other transparent objects, so this is helped me grow as an artist.
I used a pale pink for the table and a liner brush for the marbling texture, taking care to curve my lines at the edges to create three-dimensionality. To create the shiny texture of the table, I made sure that everything on it was reflected on its surface. Also, to prevent these reflections from being mistaken for decorations or things painted onto the table, I softened their edges and gave everything a slightly pink tint. I didn't want the table to look like a mirror, but I did want it to have some gloss to it. I painted this in acrylic on an 8x10 canvas. In this article, I'm going to walk you through me painting caterpillars eating milkweed in acrylics. 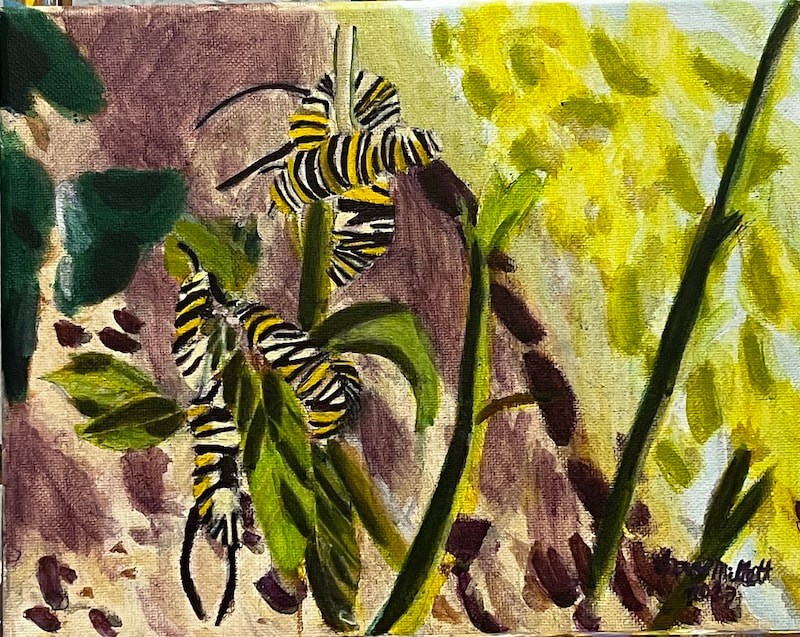 Due to the overall warm tones in my reference photo, I decided to go with a brown toned underpainting, instead of my usual gray-toned one. For more insight into how I came to this conclusion, watch this video. 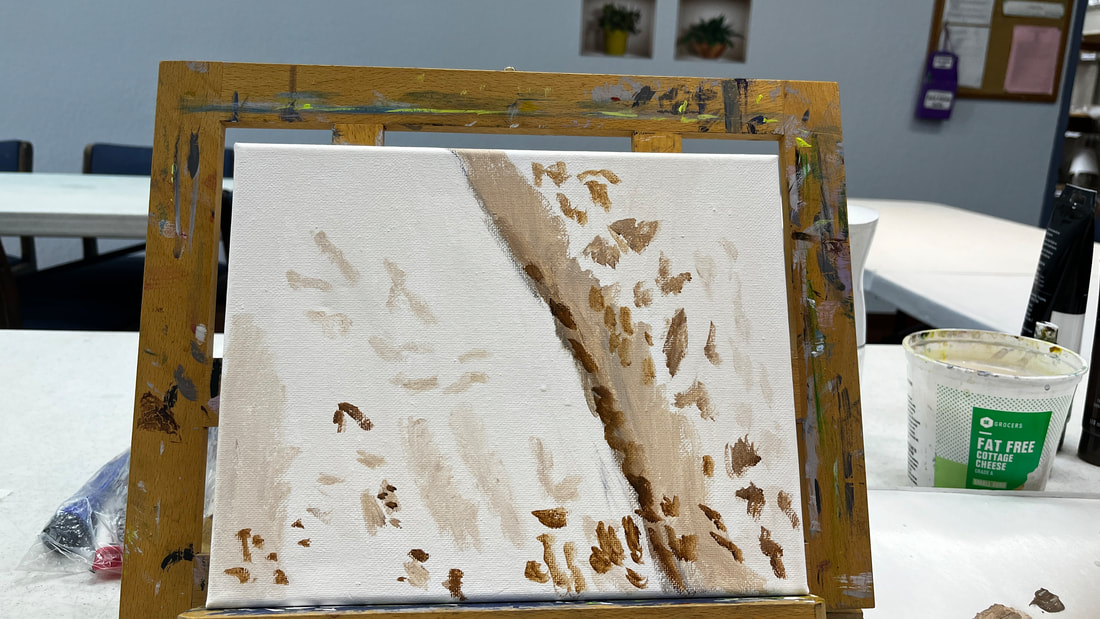 When I was ready to start adding color to the grass, I saw that it had an underlayer of blue. My first thought was that I should use blue-green. As you can see, though, I scratched that and boldly went with straight-up blue for my first layer. I used cyan rather than ultramarine because of its brighter tone. 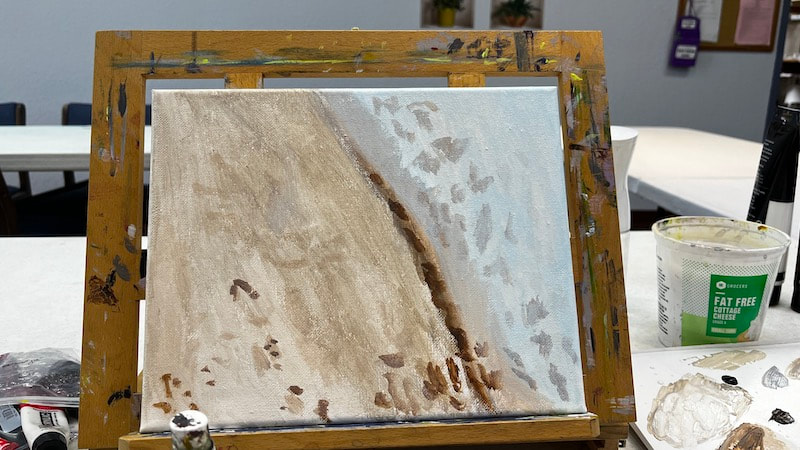 Don't get me wrong, though. The grass was going to have plenty of green, as you can see in the pic below. As I said, the tones in this painting are going to be warm overall, so the grass leans more toward the yellow side of the spectrum. I just added a bit of yellow to some permanent green to make my color. Now we get to the dirt. It would be natural to want to paint everything in this area plain brown, but when I looked at it in my reference photo, there was clearly some purple. I would've said a deep plum shade. I used straight blue violet with very little water mixed in for the small patches and mixed some zinc white and added more water into that for the larger patches. 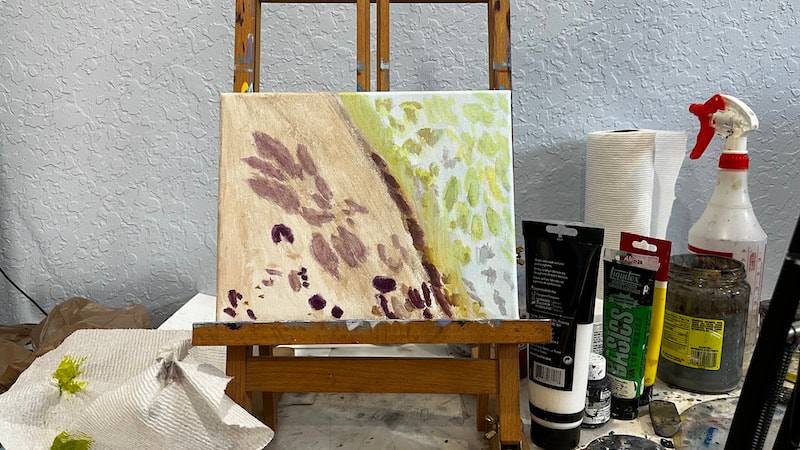 Here the painting is again with just another layer over these patches. I've done this by painting on shapes, then spritzing the canvas, blending my edges with circular motions, and repeating. 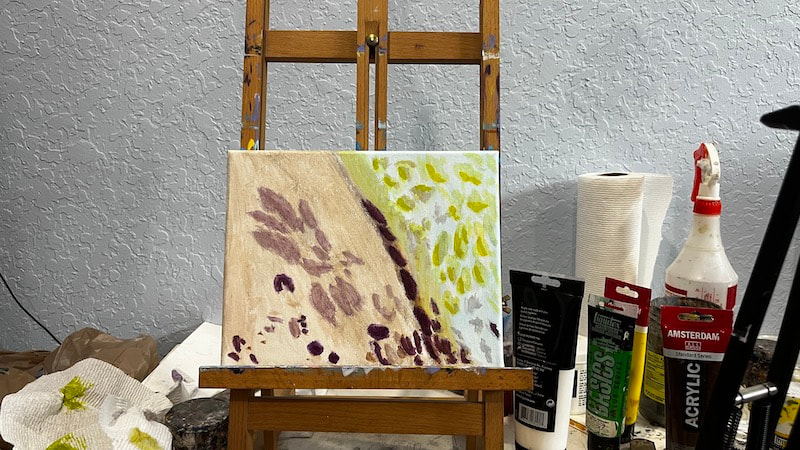 The next step was transferring the sketch onto the canvas, which I did by tracing and transfer paper. You can see that there are no stripes in caterpillars. That's because I plan to add them in after I block in the underpainting. 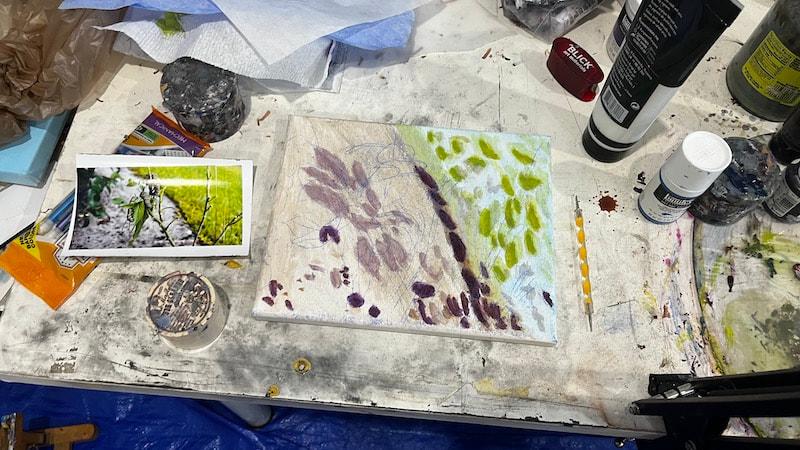 I'm painting the caterpillars the same way I did the background, i.e., starting with a brown-toned underpainting and then putting on color. 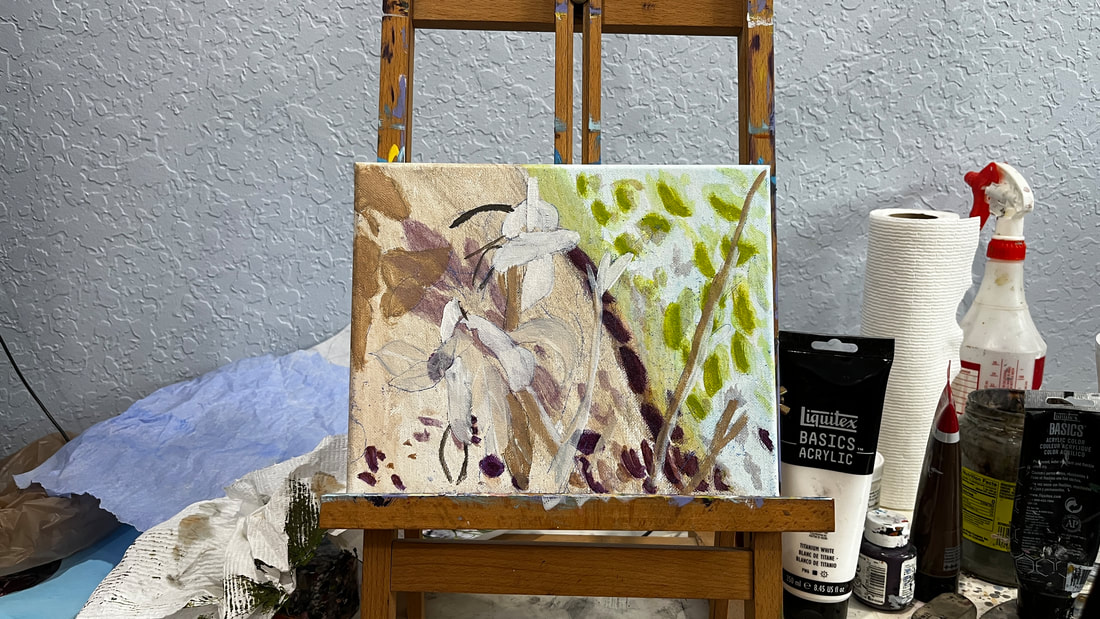 The direction of the stripes determines the shapes of the caterpillars. By curving their lines downwards as I move away from the leaves and letting their ends meet, I’m giving the animals a more rounded shape. In addition to this, I worked on the veins in the leaves. 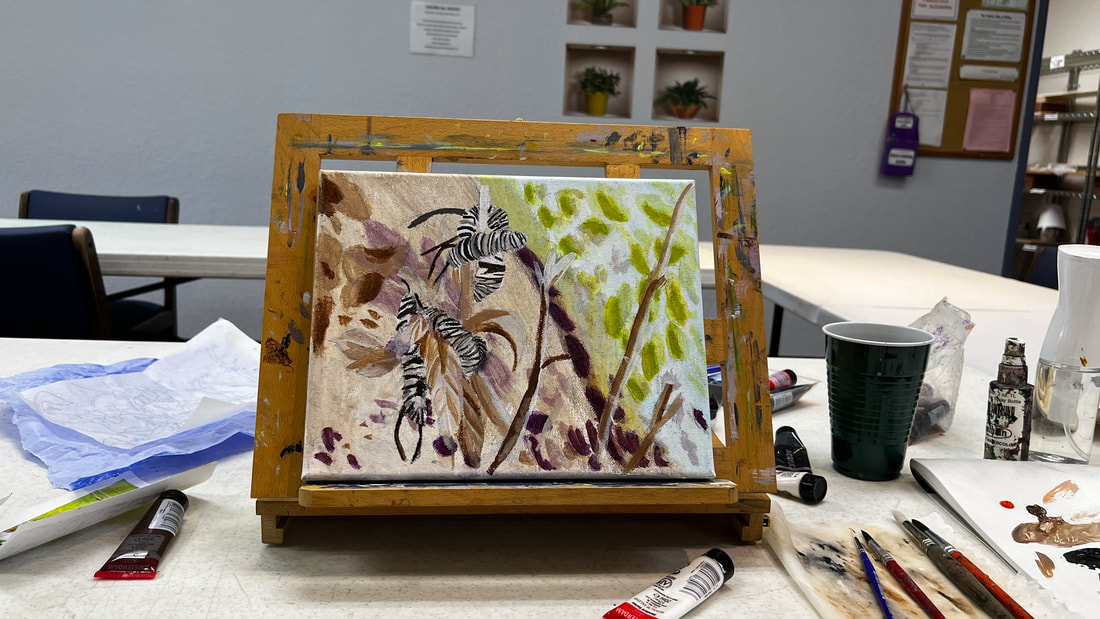 I want to preserve the definition in the leaves that I created in the underpainting, so I've been applying my color layers in thin washes, being careful to confine my darkest shades only to where they're needed. I’m using a brownish purple for the antennae and dark stripes on the caterpillars. I think it looks more natural than stark black. 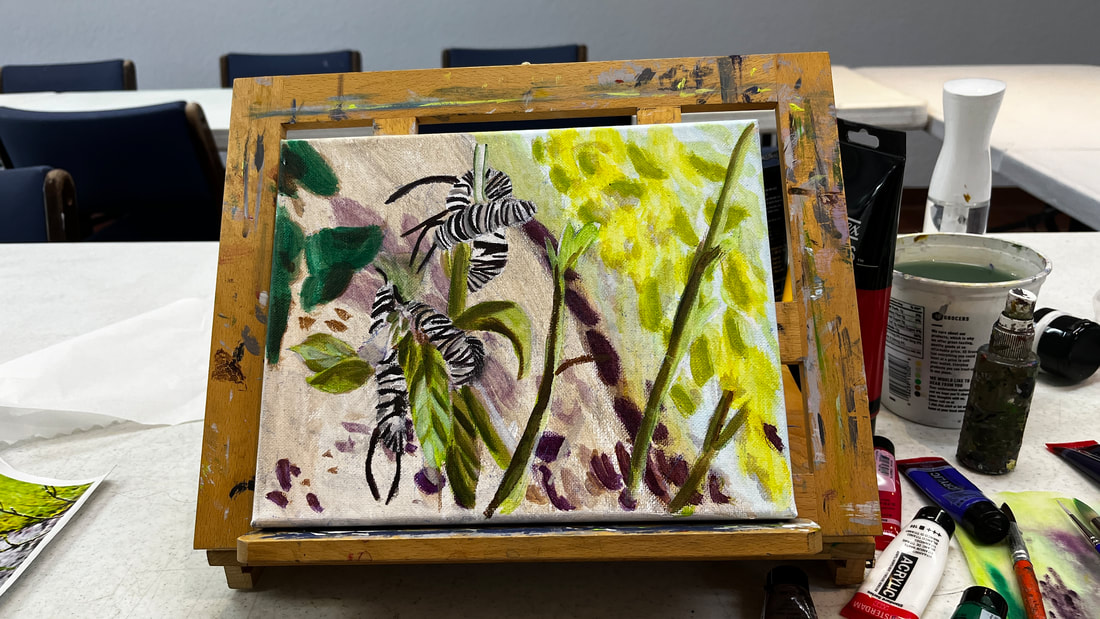 The veins in the leaves needed re-emphasizing and more shadows around them.  Here's the completed painting again. Again, I took time to increase contrast by darkening the purple patches behind the milkweed and up saturation by layering more green on the leaves. This is especially important when working on small canvases to help them stand out among larger ones in public displays.  I'm ending this post by discussing why I didn't use black for the caterpillar's stripes and antennae. I chose not to use black for the stripes on the caterpillars because this piece has an overall warm color scheme, and black would clash. Artists are divided about whether or not to use black. Some say never to use it or to mix your own. Others say if you like black, go for it. I came to the idea while working on this piece that artists against using black may feel that it’s unharmonious with the color palette of their paintings. This explains why impressionists and other artists who mainly paint nature traditionally avoid black. It's because they’re often working with this warm color palette.
I painted my community's clubhouse pool area in acrylics. Read on to find out how.  I’m starting by painting the sky, pool and deck as a base. I’m painting the grisaille and I’ll go on top with color. After I painted the shadows on the pool, I realized they were too dark and needed to be lightened.  I mixed cerulean with ultramarine for the water and glazed green on top of that to brighten it.
After I’d finished glazing color over the water and the deck, I took a charcoal pencil and drew in the plants, gazebos, chairs, and tree. At this point, it was time to start over with the grisaille again. 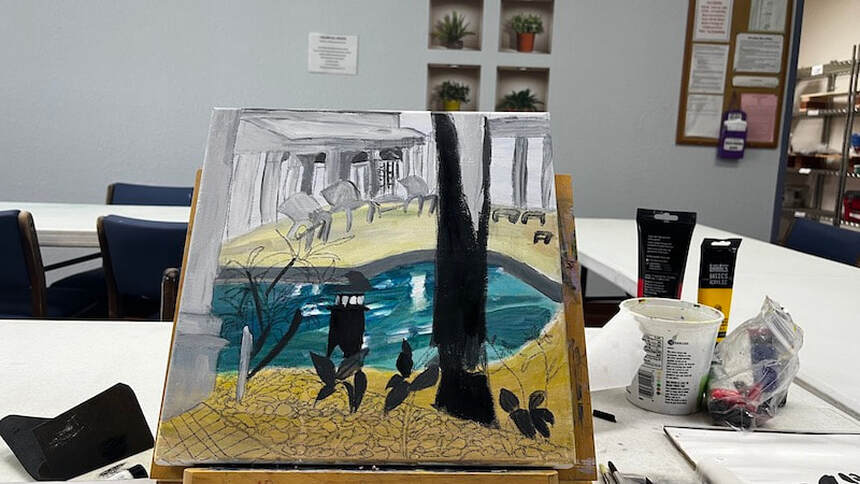 Using my liner brush and wiggling my wrist while holding the handle, I can get the roughness in the tree bark I’m going for. Making the highlight on the side of the top of the light post sufficiently light gives it dimension. I’m much happier with how the gazebo looks much better since I’ve added those dark shadows to the spaces between the posts. 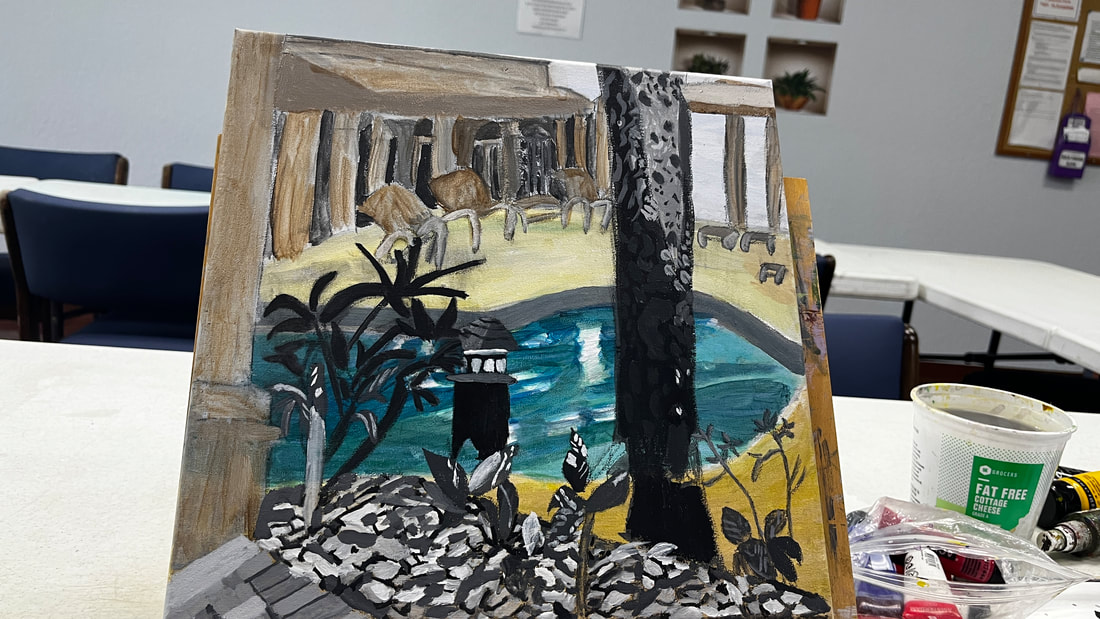 Approaching painting the pebbles, I’ve decided to mix a grayish purple from transparent mixing white and ivory black for the palest of them. The purple came out too bright, so I mixed some orange into it.
Most of the pebbles were different shades of brown, so I used yellow ochre or burnt umber mixed with cadmium red medium, which I chose for its orange tint. I had originally tried to use my yellow ochre and red mixture mixed with green and black for the darkest pebbles, but I quickly realized that mixture wasn’t dark enough. 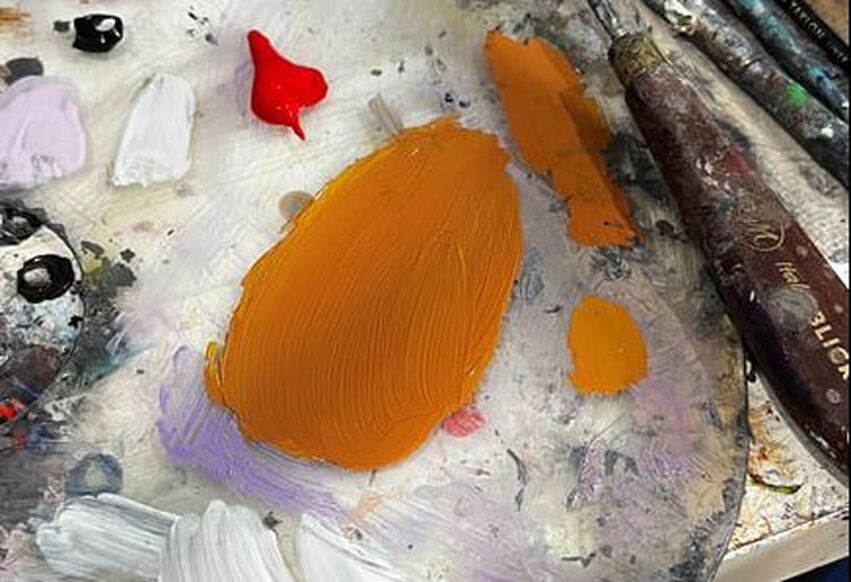 yellow ochre mixed with cadmium red medium I planned to paint the spaces in between the bars on the light post yellow and glaze orange on top of that, but I was surprised by how happy I am with just the yellow.  Here’s the lighthouse with orange glazed over the yellow.  I mixed transparent white with yellow, purple, and cadmium red medium and glazed over the gazebo because it needed to be peachy. I used an opaque version of this color for the top of the gazebo roof to create the necessary contrast between it and the sides to make it look three-dimensional. 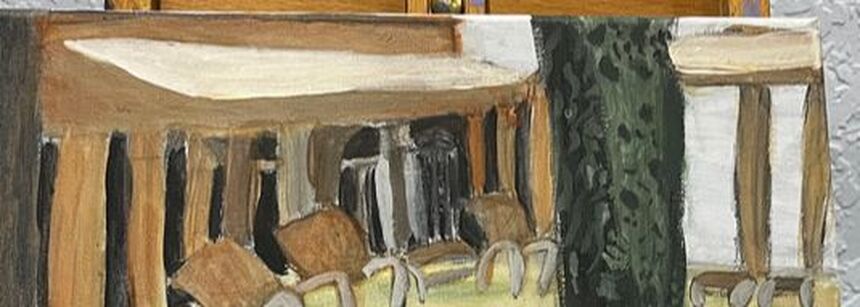 There needed to be more medium-brown pebbles. 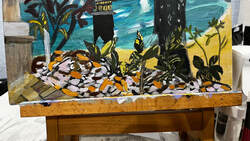 I knew the tree needed more detail, and I painted some brown markings on it, being careful to paint the same approximate shapes as were in my reference photo. 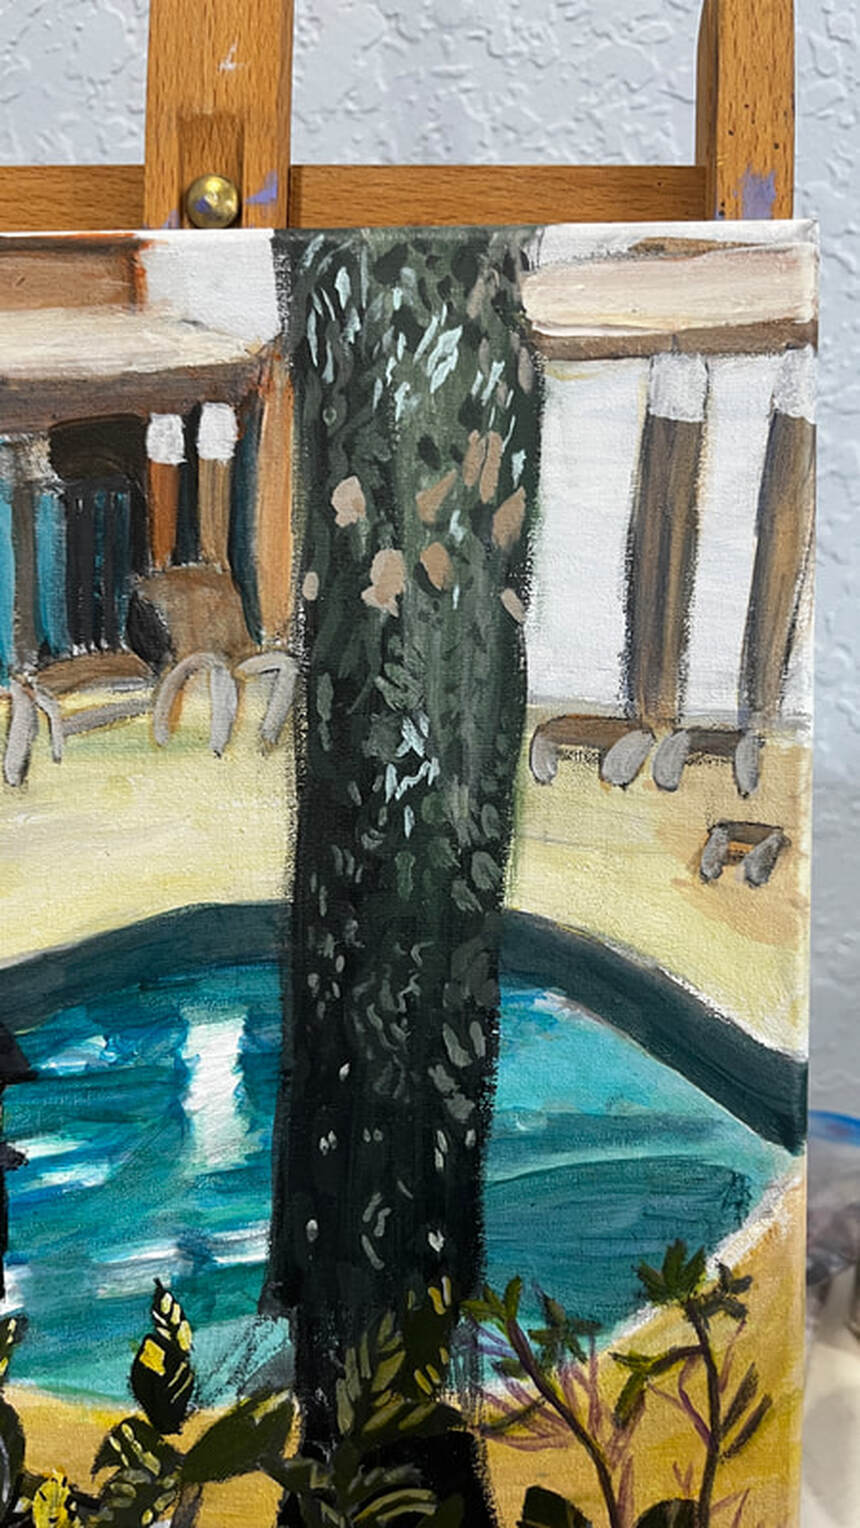 When I felt I’d done all I could on the tree, my attention was turned back to the gazebo, and I realized that there needed to be a shadow along the front of the overhang to give it dimension. I did this simply by glazing blue, which I’d toned down with orange so it would be muted and shadowy over that side. While I was doing that, I glazed that same blue over half of all of the posts. You don’t always have to do a big mixing job to get effective shading in your pieces. I saw that the windows in the gazebo looked to be bluish green. I used cyan instead of ultramarine this time when I mixed the shade for them. 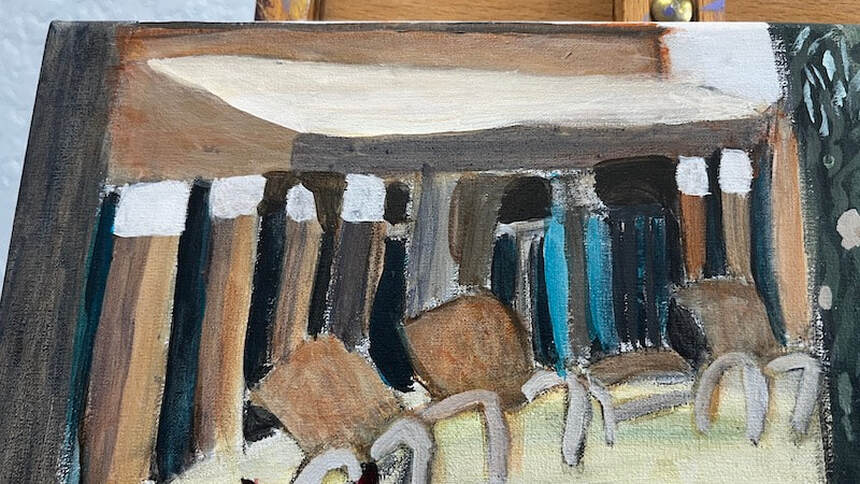 The first thing I did today was paint pale purple highlights on the reddish-purple leaves in the lower left-hand corner. The shade I mixed didn’t come out red enough, so I glazed some red over my purple when it had dried.  You can also see the light post in this pic, and you might notice that I painted two-thirds of it a lighter shade of gray, so now it looks like it has a front and a side. There was some obvious dry brushing in between the posts in the gazebo and on the edges of the tree, so I worked on taking care of that. Dry brushing is when there are little holes or bumps in the paint due to insufficient paint or water in the brush. So the fix for dry brushing is to go back over those parts with the same color, of course, but with just more paint and/or more water, in the brush. I painted reflections in the pool by wiggling my wrist from side to side, then spritzing the canvas with my cosmetic spray bottle, and then blending out the edges of the wet paint with a dry brush. 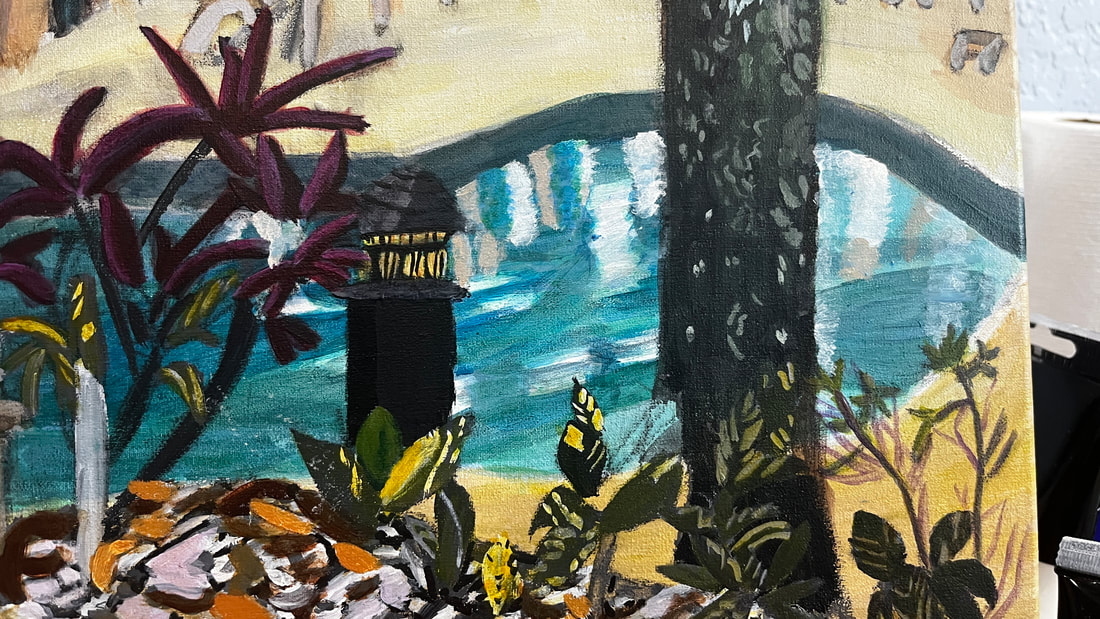 Then I glazed a layer of blue-gray over all of this. My first layer was too sheer. I wanted the reflections to look almost cloudy underneath. 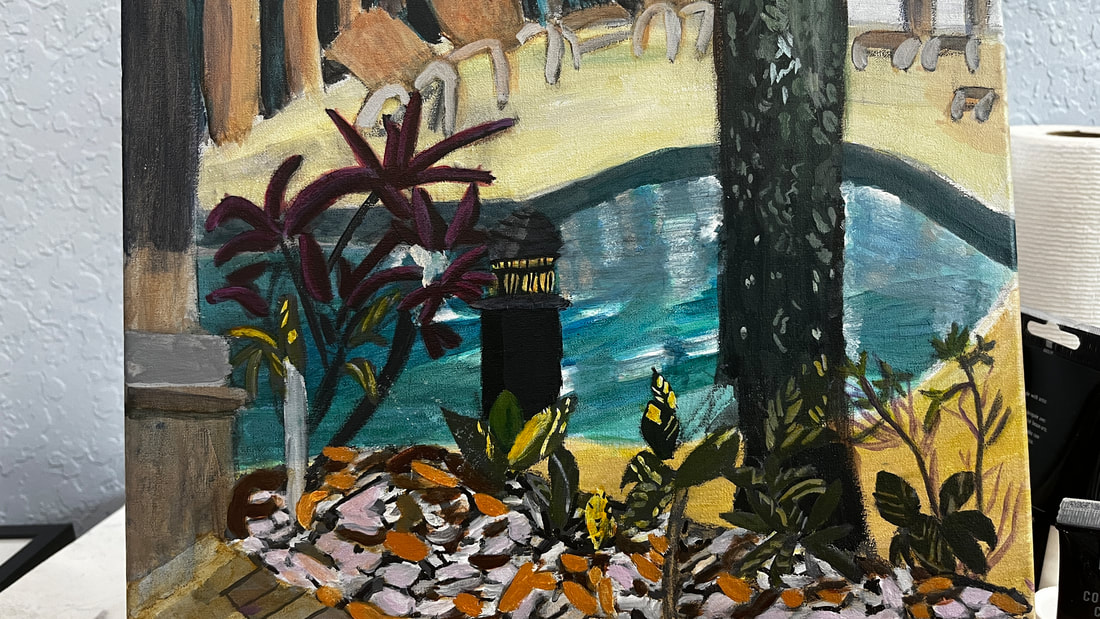 I painted more green detail in the tree using a liner brush. I blended out the edges so they wouldn’t be harsh lines. 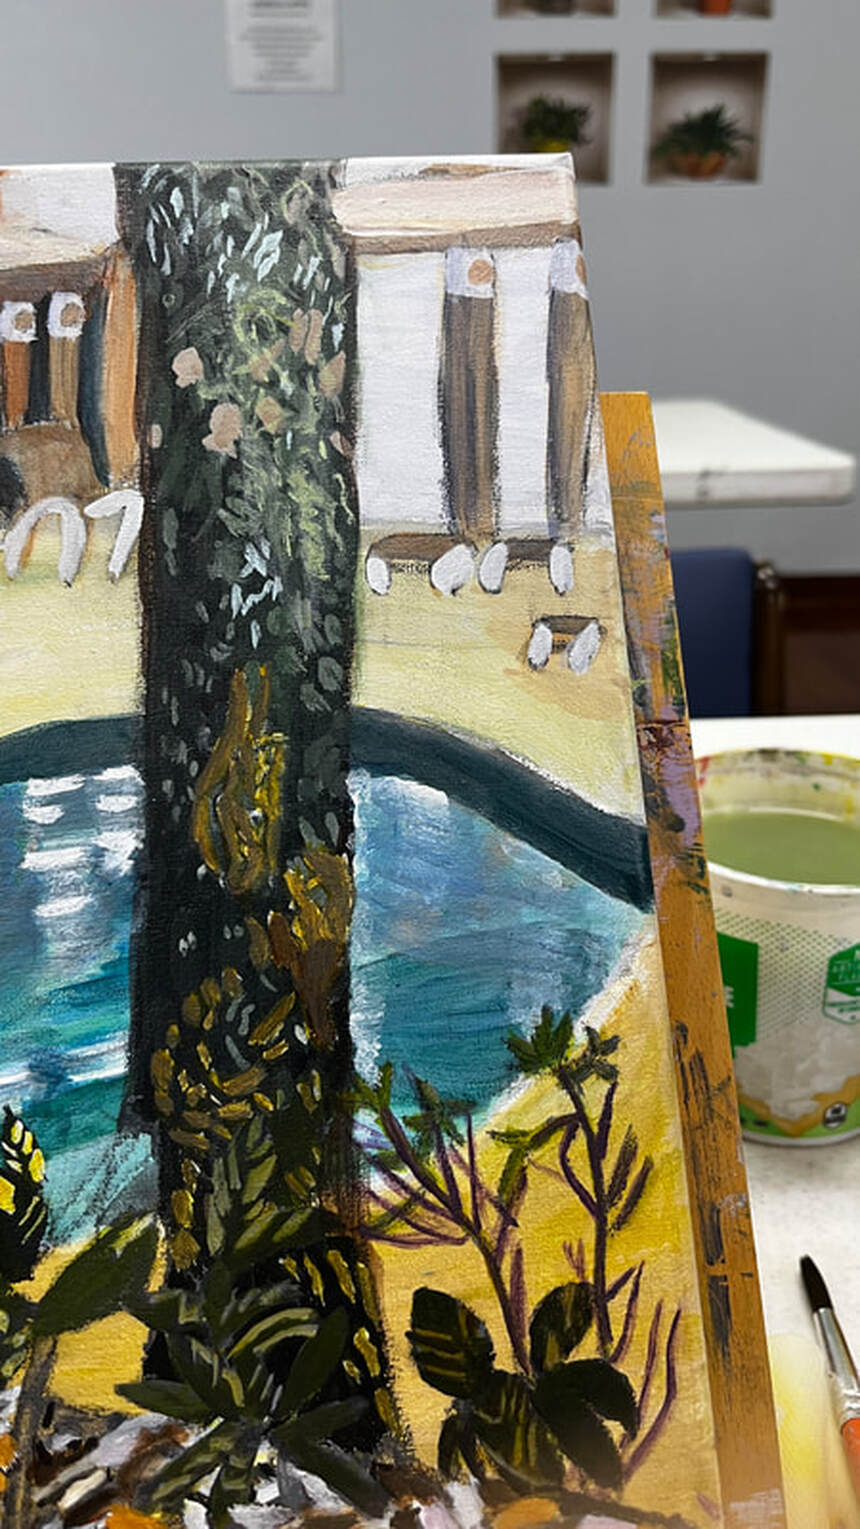 Those brown spots were too warm when I first put them down, so I added blue to my mixture for the second layer. I was finally satisfied when I mixed some gray into my brown. I glazed burnt umber over these leaves and I think they look much better. The color I’d painted them had been bothering me for a while. 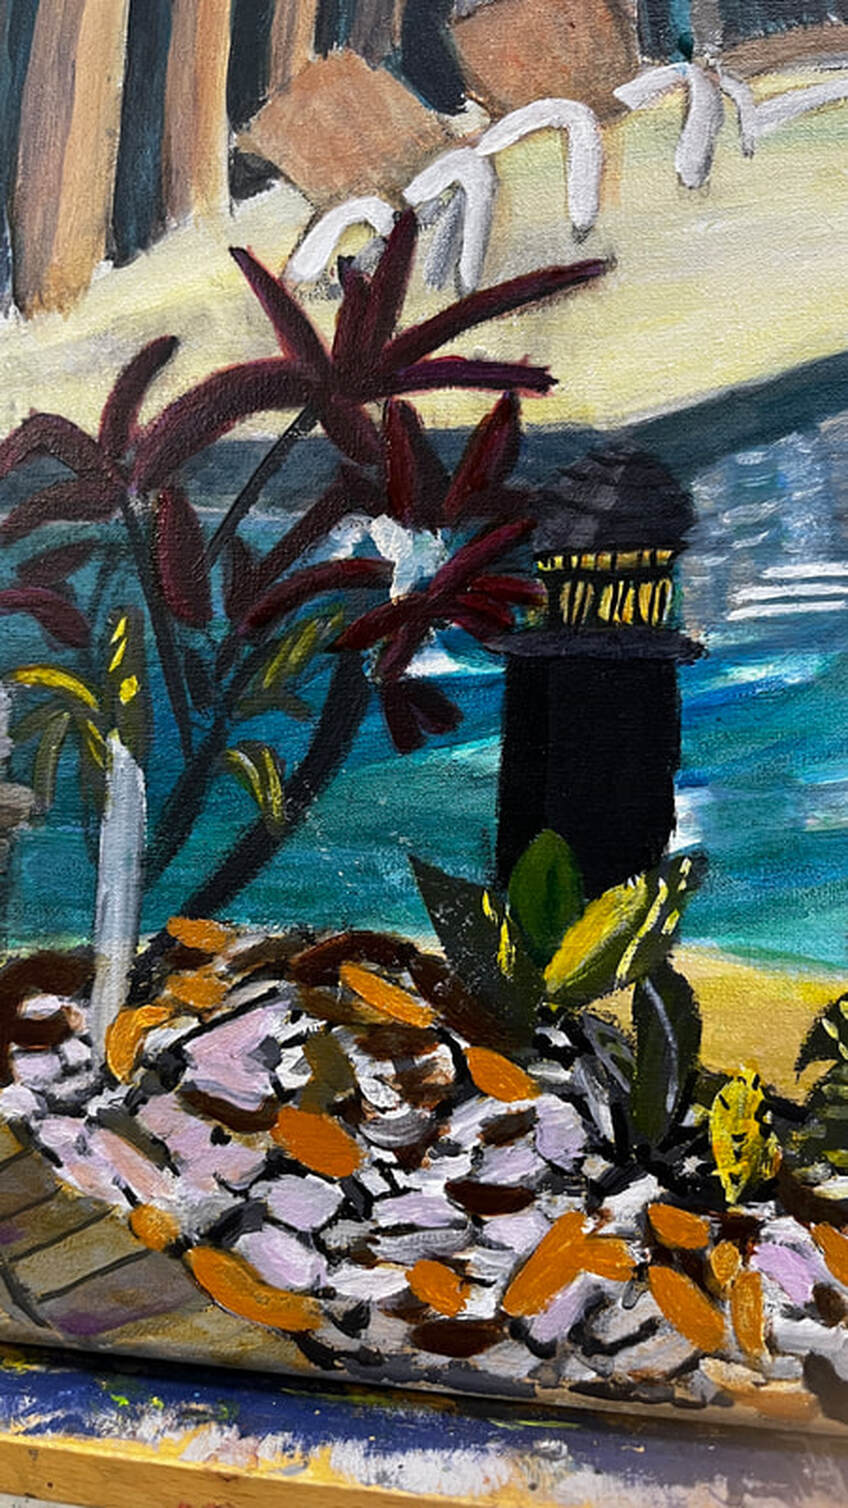 Being almost finished with this painting, my main concern today was adding contrast and saturating colors where appropriate. I darkened the edge of the pool, the windows of the clubhouse, and the tree with ivory black. I also lightened the deck with transparent mixing white. What I was really interested in, though, was brightening up the water in the pool. I did this using a combination of dark permanent green and, later, ultramarine blue. I was pretty satisfied with my work, 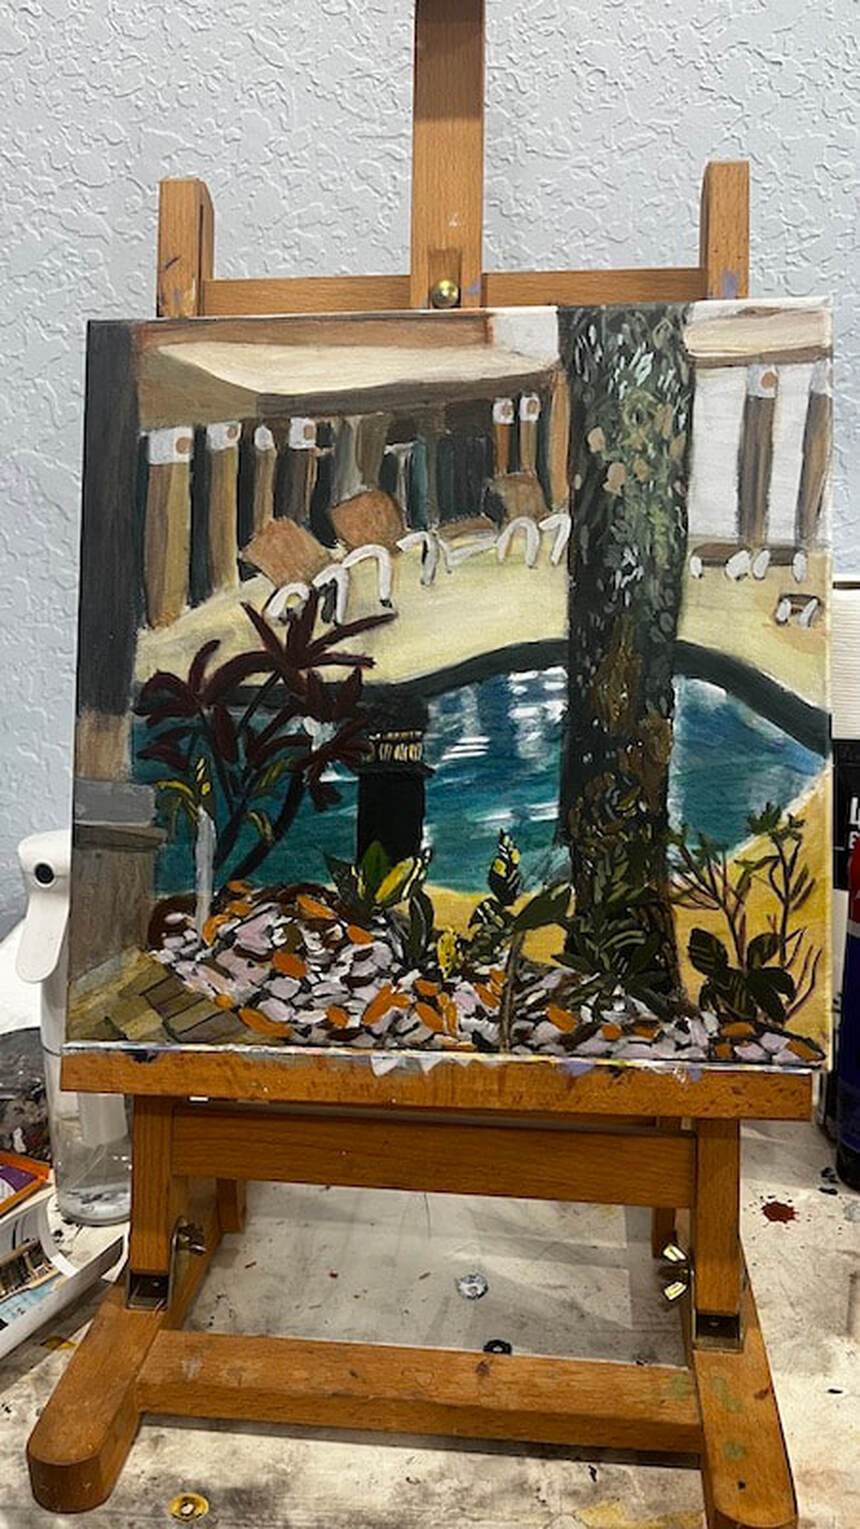 but then, while I was cleaning up, a bottle fell off a shelf, and when I looked at it, I saw that it was Prussian blue, a color I hardly ever use. I wondered if it was still good, as it didn’t seem to want to squeeze out of the container. I scooped some out with a brush and, while it was on my pallet, thought to myself that it really was a beautiful color and it was a shame I didn’t use it more often. It might just be perfect for what I’m going for with this swimming pool, I thought. 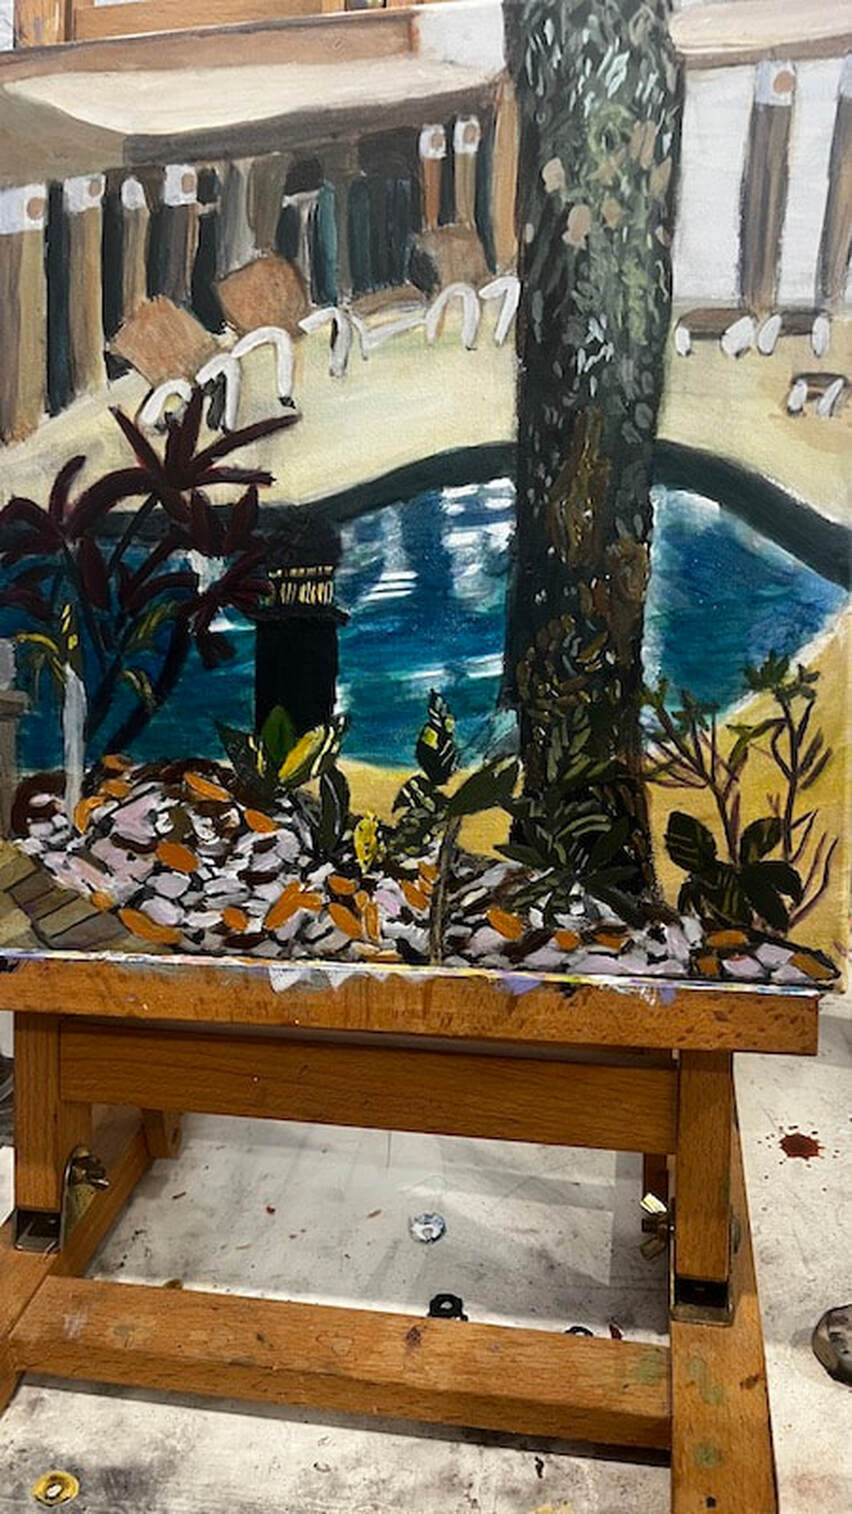 Before adding the Prussian blue, the water looked gray in comparison. I used a 12x12 watercolor canvas from Fredrix and paint from Liquitex and Royal Talens for this painting.
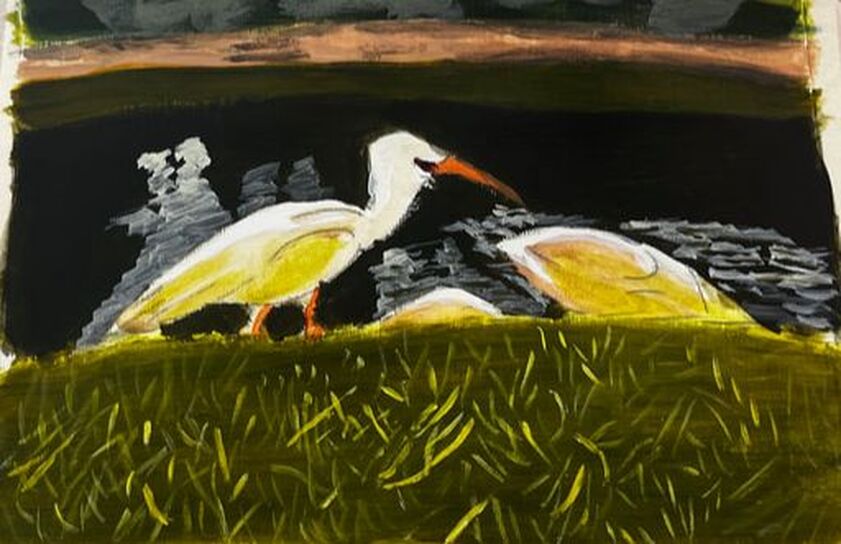 I don’t paint enough white things, tending to shy away from them because I fear they will look too stark. My mind tells me it’s better to stick to black and white. It’s time to face my apprehension and do a project that features a white subject, these ibises, in color media. So I'm painting white ibises in acrylics. Before I get to the white ibises, though, I want to discuss the grass and lake around them because the shades I use to paint those will play into how I paint them.Before I get to the white ibises, though, I want to discuss the grass and lake around them because the shades I use to paint those will play into how I paint them.
I used the same base of yellow and ultramarine blue for the patch of grass near the viewer and the bush on the other side of the lake. I used more blue for the bush and added red and black to the lake to mute and darken it.
I want the patches of grass bordering the lake to be somewhat bright, and I’m using analogous colors to do this, glazing yellow over the nearest patch and blue over the far one. 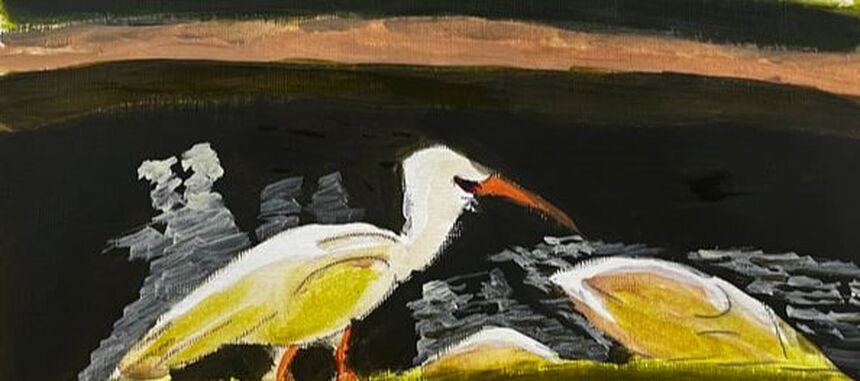 After painting another layer on the grass near the viewer, I mixed some yellowish green color into titanium white. Then I painted reflections in the water using a small round and a sideways wiggling stroke.  As for the ibises themselves, I painted most of their bodies with sheer light brown and green, picking up the grass and lake bed colors. I left only the very tops of them white. This is where light would be hitting them; therefore, it would be the brightest. Did you notice what I did here? Less than ten percent of the white ibises’ entire bodies were painted white. The rest were painted to reflect the colors of the things around them. This is why I mixed yellow-green into my titanium white when I painted the shadows. The ibises do not show as pure white. Therefore, their reflections couldn't either.  Back to the grass, there are lots of individual pieces of grass in the patch nearest the viewer. I used titanium white first because if I went in first with my yellow-green mixture, it wouldn’t show up properly against what I already had down. Having the titanium white down was especially important because these blades of grass needed to be lighter than the base. These blades gave the grass the brightness I’d been trying to achieve by glazing yellow over the area.
I had been frustrated with the lack of intensity in my darks regarding my shading. Sometimes, I wanted the extra drama that even my darkest pencils weren’t getting me. Shana Rowe Jackson had made a video in which she made a drawing with some genuinely black shading in it. I looked up that video, found out what pencils she’d used, and ordered them. Those pencils were the Mars Lumograph Black line. Now, I have to admit, when I opened the box and looked inside, I was skeptical because the pencils went from 2b to 8b, which were grades of pencils I’d been using all along. But these are not like the other pencils I’d been using. I believe the Mars Lumograph pencils each have a bit of carbon mixed in with the graphite so they can get much darker than a regular graphite pencil of the same grade. To prove to myself how different these are, I tested them against my pencils in the Faber-Castell line. 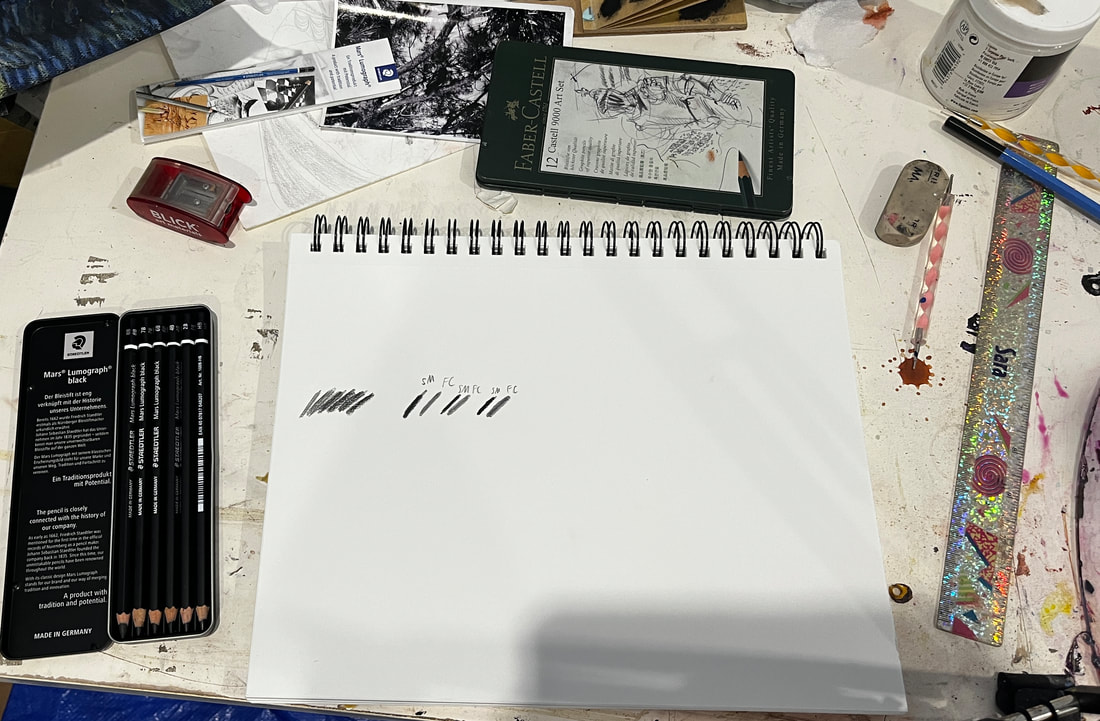 While these pencils are indeed very dark, they don’t cover the paper as well as I was hoping. Achieving the stark black I’ve been going for has required a slow process of layering. It occurred to me that the pencils might not be sharp enough to cover properly. I started looking up “how to get pencils super sharp” on YouTube. That search yielded a video from Leonardo Pereznieto. The method described in the video involves using a blade to remove the wood from the pencil and sandpaper to refine the lead. It’s slow and tiring, but it leaves my pencils sharper than any pencil sharpener I’ve tried. 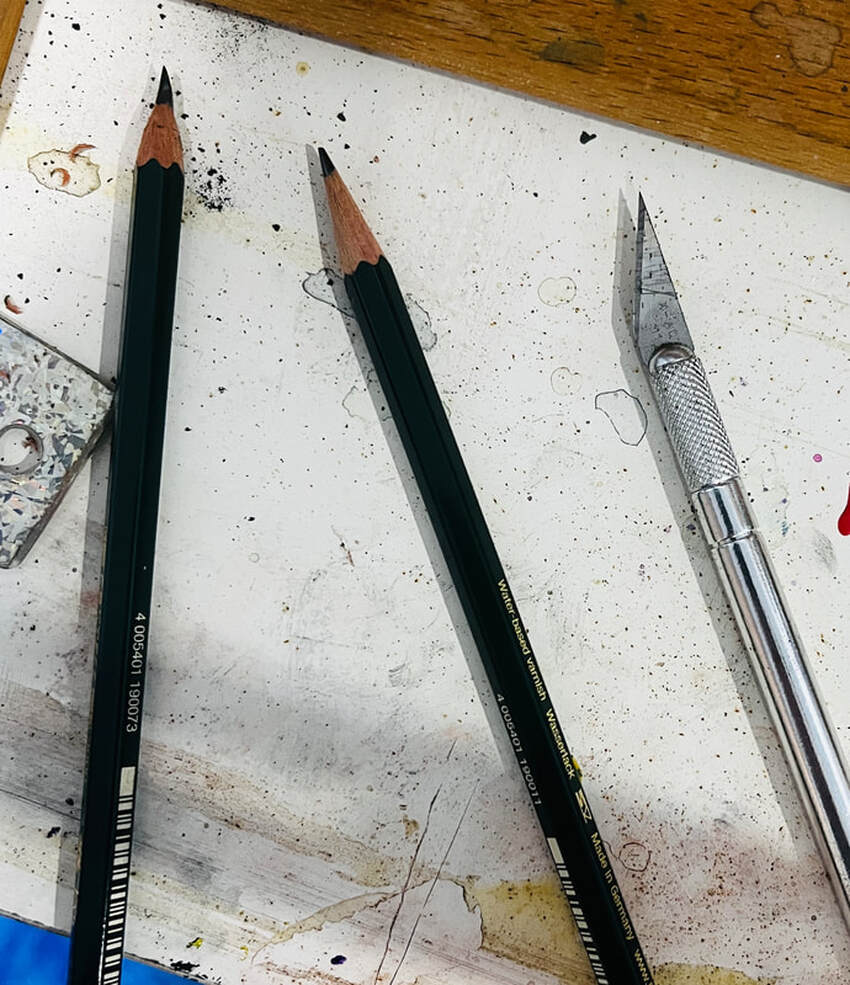 I was working on a drawing of some ducks, and I’d left it a while ago. I’d wanted darker shading on it than I could get with the pencils I had at the time. I decided to try using the 7b in the Mars Lumograph line. While doing this, I accidentally discovered that these pencils might cover better over other pencil than over blank paper. Unfortunately, if I’ve already started with the Mars Lumograph, it’s too late, as I found when I tried to use my Faber-Castell pencils on the gate posts in my drawing. 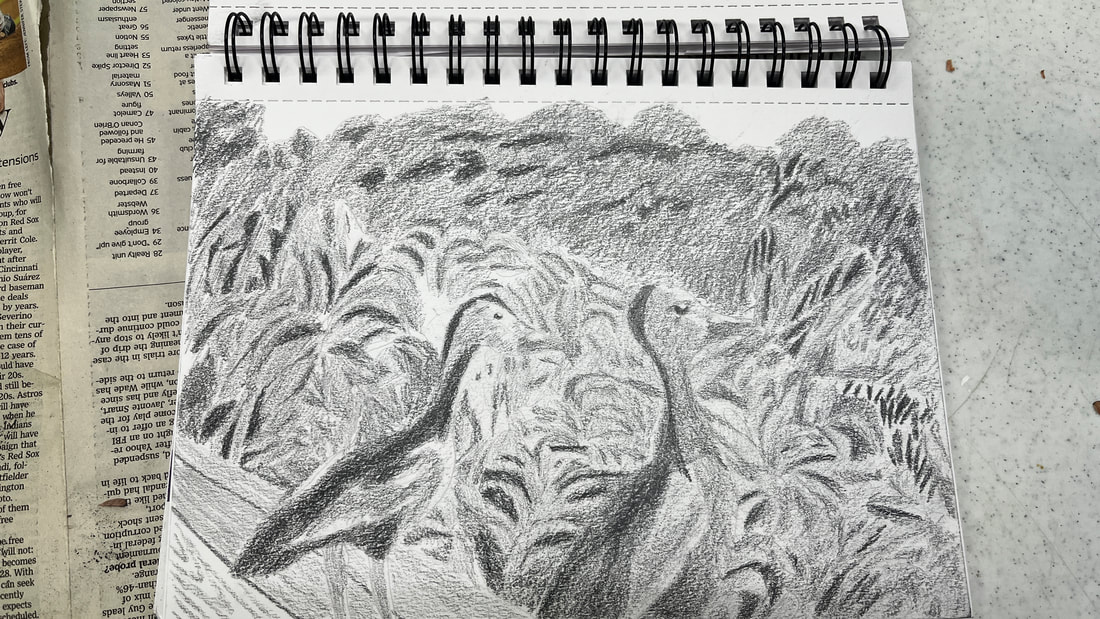 Going back to my bird bath drawing, the edges are where I really want to direct my attention for these things to look truly filled in. The edges are where I really want to direct my attention for these things to really look filled in. Going slowly and methodically gives excellent results. All in all these pencils are definitely worth pick up if you're going for dramatically black shading in your drawings. 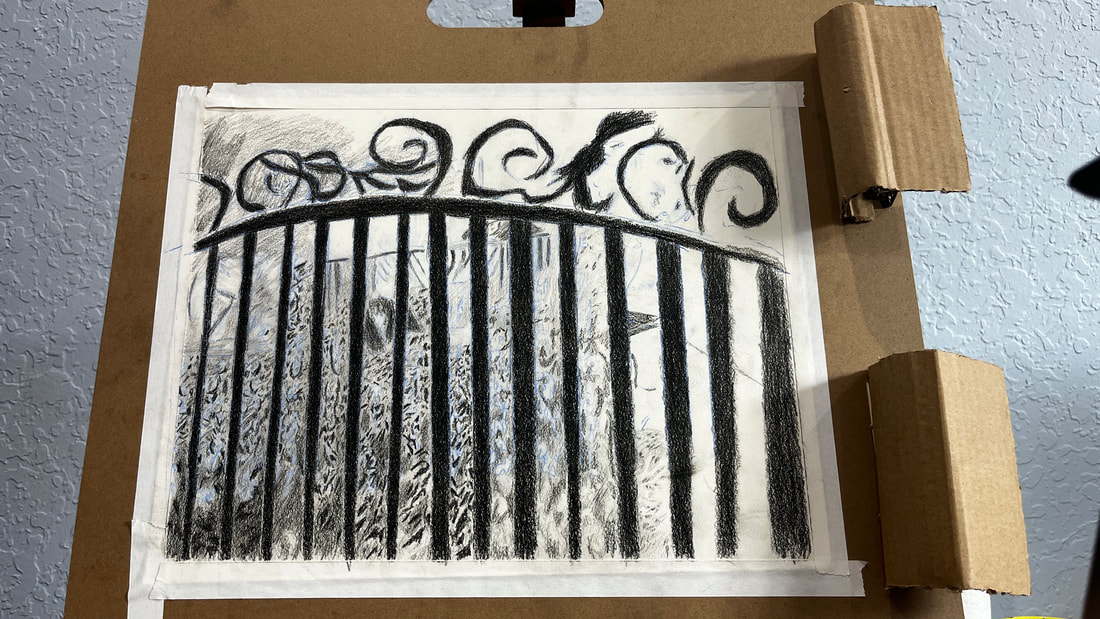 |