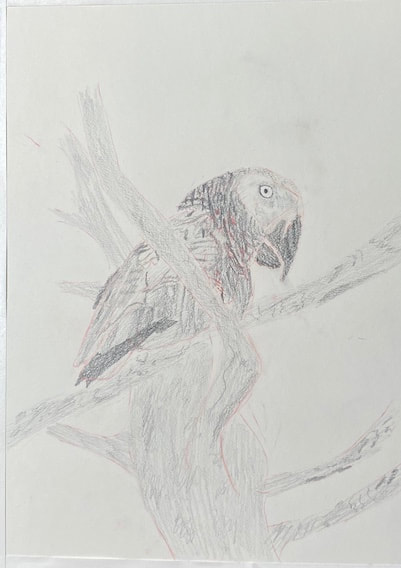
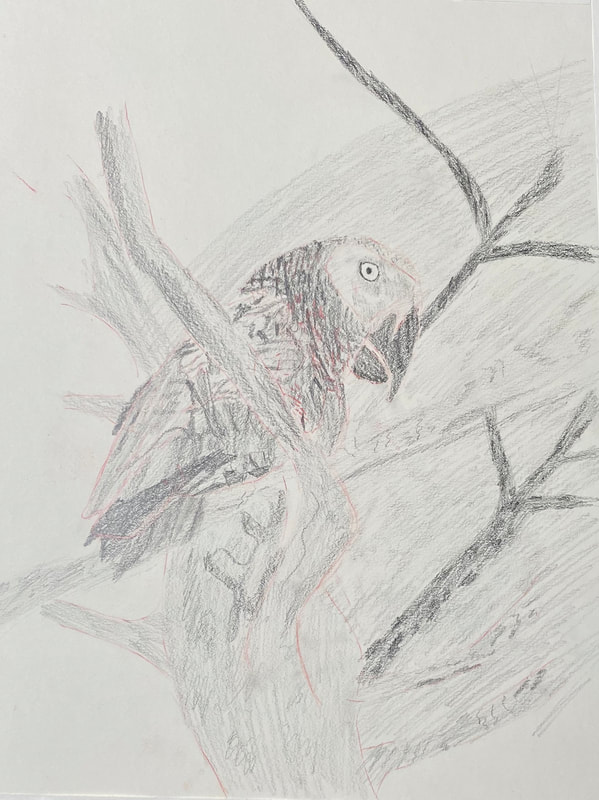
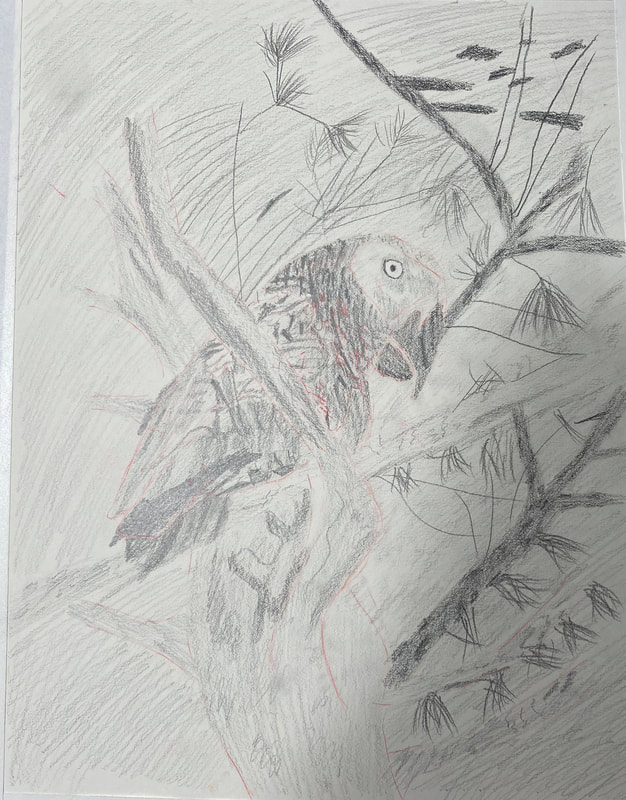
I saw this bird once in a tree in a park near my house. It didn’t look like any common city bird you see around, so understandably, I was surprised to see it just chilling in a tree. I thought, that bird looks like something I might see in a zoo. How did it get in this park. I didn’t even know what kind of bird it was at the time. I guessed it was a kookaburra because it made a noise like one. I readjusted the lines of his body, particularly his head and the right-hand side of chest several times before starting on the details. While drawing his feathers, I made little flicks of my wrist. I almost drew them randomly instead of trying to draw each one in the exact right spot. By being overly careful, I could’ve easily fallen into the trap of drawing the feathers in rows and that wouldn’t have looked natural. You can be too careful sometimes. I drew my outline onto a separate piece of paper and transferred it onto my drawing paper using tracing and transfer paper. I don’t think I could’ve said the word paper more times in one sentence. When I started shading, I went right in with a 5b pencil, keeping a light grip on the pencil and going in little circles. This seems to make the shading more uniform than going back and forth. I blocked in his entire body with a 3b pencil. When it came time to add the feathers, I did so by shading in shapes that I saw in my reference photos. A lot of these were little triangles. Some of the feathers seemed to be groups of horizontal lines in rows. To draw these, I didn’t take my pencil and drag it from one end to the other in one motion. I made vertical back and forth motions with the side of my pencil in horizontal rows, keeping my wrist moving rapidly. Almost like scribbling, but not quite. It’s important that these lines curve in the right direction and that they’re approximately the right distance apart. Day Two I’m continuing to shade the feathers. It gets tiring staring so closely at all this detail. I look for where certain shapes of shading are in relation to each other and this helps me make the shapes of the feathers. I think more needs to be done on the tail, so tomorrow I’ll focus more on that in my reference photo. I’ve taken a closer look at his eye and the patch around it, which I can see now is not really white, and in fact, had much more shadow on it then I thought. The eye itself is very white and is surrounded by a ring of black, which gave it an eerie glow. I’ve started to fill in the tree branches with a 3b pencil as a base. Day Three Getting back to the branches, I drew the details on them by holding the pencil way back on the handle, using the side of the pencil, and wiggling my wrist back and forth. This made my strokes come out kind of zigzaggy. I didn’t want to take too much control and I didn’t want anything very uniform or perfect. I made sure to vary the size and thickness of my marks. Day Three Sometimes you try something new and it doesn’t work. I tried to create the texture of the feathers using only shading and no lines. It turns out though that, while the viewer doesn’t to see them, I needed some lines to guide me not only in the direction the feathers should go, but in how they should be shaded in the first place. Example: I drew in a feather with my 6h pencil next to one I already shaded. Immediately, I knew that there was a small area between the feather I’d already shaded and the one I’d just drawn that needed to be lighter than the surrounding area, significantly lighter in fact. Some things started to stand out to me during this drawing session, like the bird’s tail feathers and the underside of his belly. When I started to feel fatigued working on the details of the feathers, I thought it would be a good idea to direct my attention to the background. I was ready to start shading it in when I noticed the thinner branches in between the thick ones I’d already drawn. I drew those in with my 6h pencil and filled them in with a 6b as base. Day Four I finished filling in the background with my 3b pencil. I had no idea what I was going to do after that, so I looked at my reference photo to give me some guidance. I went to work drawing more thistles on the branches. I just let my wrist flick as I did so, not being too careful to put every line in the right place. The only thing I was concerned about was that they were adequately filled in. I didn’t want a lot of space between my lines. Day Five After a little break, it was time to get back to work on this. WOW! It’s amazing what a little sharpening can do! I just went over a lot of what was already on the paper with sharpened pencils and it looks so much smoother. Day Six I figured out I needed to go over things with more layers. Just because there’s pencil on the paper, doesn’t mean something’s finished. There shouldn’t be any white of the paper showing, unless, I, the artist, want there to be. There certainly shouldn’t be any white of the paper showing just because I don’t have enough pencil on the paper. I don’t push as hard as I can and go at it with the pencil, though. I build it up a little at a time, keeping a light hand.
0 Comments
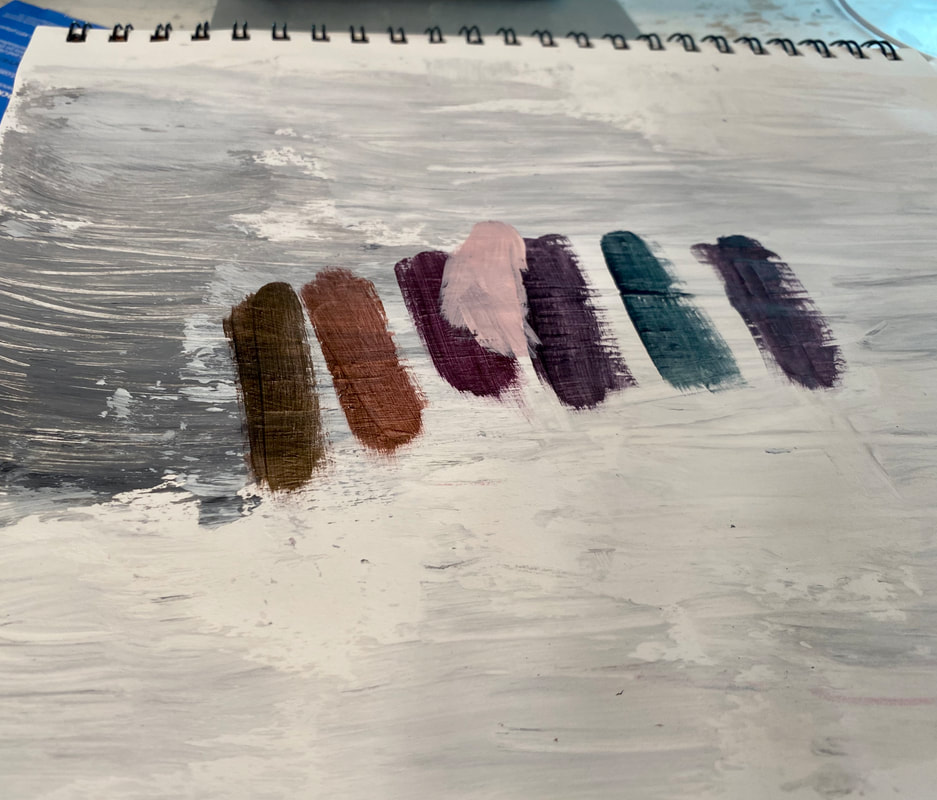
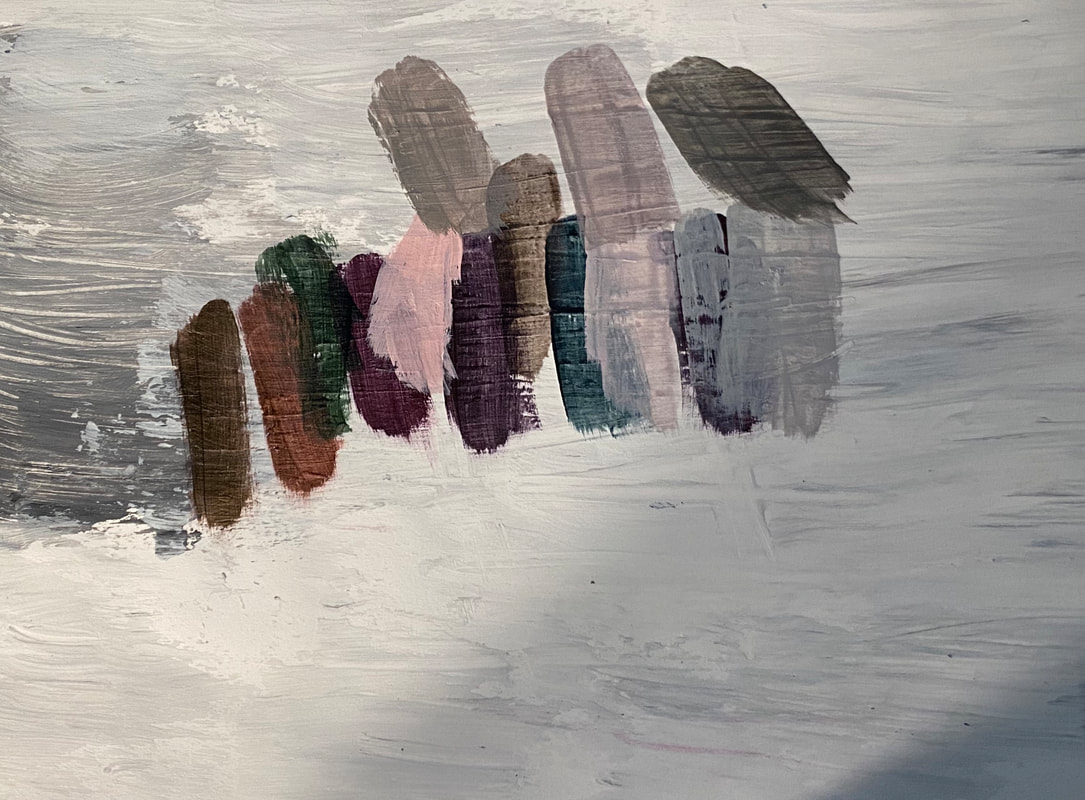
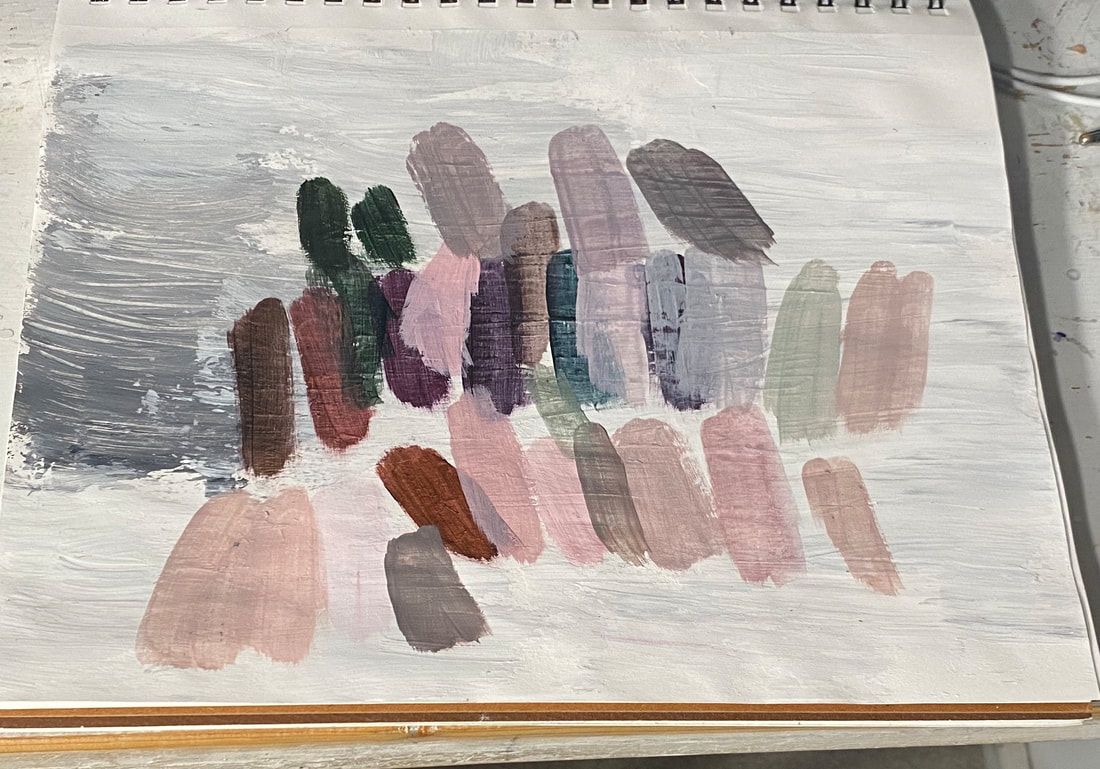
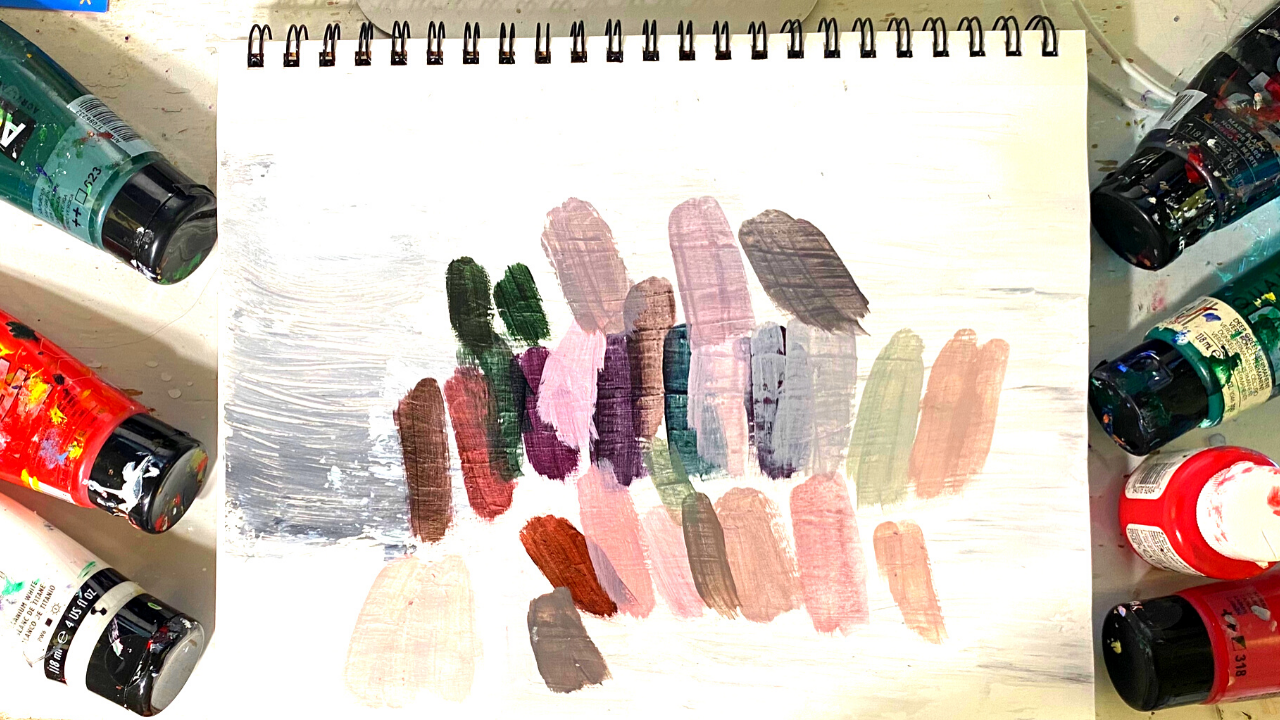 Day One: I gessoed a piece of sketching paper because I want to do some experimenting with acrylics. I don’t have boards I feel comfortable experimenting on and guessing sketching paper makes it suitable for acrylic and even oil paint, if you use the right gesso. Little tip there. What I want to experiment with is mixing flesh tone from red and green, plus black and white. I’m going to be using one shade of red and one shade of green and trying to mix as many flesh tones as I can just by varying the ratio of red to green and how much black and white I add. I’ve been inspired by this video from HappydArtist. Day Two I ended up using carmine from Amsterdam Standard Series as my red and Permanent Green Deep from Liquitex Basics as my green. It soon became clear to me though, that mixing skin those shades was not going to work. I remembered hearing that quinacridone was a more neutral red and I knew I had some in my paint box, so I decided to try it. Carmine leans very much toward the blue side, which probably accounted for the purple tone I kept getting. I did like my initial results with the quinacridone much better. I felt I was getting an actual neutral brown instead the obvious purple I’d gotten before. But I still wasn’t happy with my results. It seems no matter how I mix these colors, they’re either too rosy or too gray. By the time I got up from trying this experiment for the first time, I spent almost thirty minutes just mixing colors. I’m not willing to spend that much time coming up with a flesh color when I know I have faster methods. I have mixed red and green in the past, but I usually mix a green from yellow and blue instead of using a green from a tube. It’s more time consuming, but I think I actually get better results this way because of how I can control the outcome of the color and make it more neutral. I think, like the carmine, the deep green permanent just leans a bit too much to the blue side. Day Three Coming back to this experiment, having taken another look at Happyd’s video, I decided to try using sap green instead while still using the quinacridone. After some further fiddling, I came up with a color that I think I would be happy to use on someone’s face. My next challenge is to take skin photos I’ve cropped and come up with a colors that match, as closely as I can, each of the people’s skin tones in these photos, using only the two colors of sap green and quinacridone red, plus black and white. Day Four Now I’ve switched from using quinacridone now to using cadmium red medium. Now I’m using both colors that Happyd was using in her video, the cadmium red medium and the sap green. I think these colors work very well for mixing a fair or Caucasian skin tone. I’m not sure about other colors, though. I’m debating with myself whether or not to even try. Day Five I decided not to try to mix the specific shades of skin that were in my downloaded reference phots, but to instead try mixing darker values. I did this by just mixing more of the red and the green into my mixture and then some mars black when I wanted it to be really dark. Conclusion I will likely not be adopting mixing red and green as my go to method for mixing skin tone. I enjoy using a range of colors. I don't feel that just two colors give me the range I want. For my most recent portrait, I mixed the skin from cadmium red medium and deep green permanent, but I added some yellow to neutralize it because my original mixture was too purple. Then, there’s my trusty raw Sienna. Even so, it was nice to do this experiment and I plan on testing out other mixes of complementary colors for skin. I might find these different combinations work better for different ethnicities of people, for instance. Here's a gallery of the pictures I took during the course of this experiment. |